Showing posts with label LoRa. Show all posts

Sunday, July 15, 2018

Pushing a button. From afar. With LoRa.

This blog entry is about pushing a button. Seems simple enough, eh? Except when the button you want to press is very far from where you are physically located... say, when there's a remote gate control well out of sight and out of range for the remote. Oh, and it is also too far to have any network connectivity. What to do?

My plan is to use LoRa to communicate from an M5Stack console to a distant LoRa32u4, each equipped with a LoRa module; essentially push the button of the remote from afar! The actual pysical button push on the M5Stack will essentially be "sent" (via LoRa message) to the remote 32u4 which will then trigger the actual remote control transmitter. The working prototype is shown here:


How to get there: The first thing needed is to disassemble the remote and determine how it normally works. The remote I am using is a Somfy TR2 similar to this one that can control two different devices. Upon disassembly, the first thing we see is those two buttons each with 4 pins. The buttons appear to be very similar to this Grayhill Gull Wing 95C06C3RAT at Mouser as documented here. Note that although there are 4 pins, it is simply a SPST switch:

Photo credit: Grayhill spec sheet

I confirmed both visually and with an ohmmeter that indeed I have a similar switch and proceeded to connect some external wires to it:

Somfy remote switch wiring

If you look closely, I took the time to wrap the wire around the pin of the switch to make a good mechanical connections, while being careful not to touch any other circuit. It would probably be a good idea to use some hot melt glue and affix the wires to the pc board.

Here, Green is a ground (all 4 pins, 2 from each switch); Orange is BP1 and Yellow is BP2. The top of the battery is labeled as being the positive side. The entire metal surface here is at 3.3V:


This turned out to be an extremely handy arrangement for me: the entire device could essentially be the "load" for an NPN transistor circuit!

Putting an ammeter between either the orange or yellow pins to ground, I found about 0.3mA that would otherwise flow though the button (or a transistor).

Looking at the specs for the 2N3904, the max collector current is a whopping 200mA  max, well over a couple orders of magnitude for what we'll need:


And for a collector current of (we'll round up) to 0.5 mA, we'll have a minimum gain of around 60 to 80 (let's pick a gain of 70 for discussion-sake):


We'll need a base current of around  (0.005A / 70) =  0.0714 mA;  For the current-limiting base resistor, we'll thus need: 3.3v / (0.0000714) ~= 40K ohms. I didn't have a 40K handy, but I did have a bunch of 20K ohm resistors laying around, so I'll use that. It is still well within spec, and will certainly account for any gain drift or degradation.

Our button-pressing supplement thus looks like this (shown for BP1, but the same for BP2):
Note that this circuit will allow our 32u4 to control the remote via a GPIO pin. Fortunately the remote is also smart enough to turn itself off - if for some reason the button remains pressed so that the battery does not drain (such as being poked by your keys in your pocket). In our case: regardless of the state of the pin during power up (or application crash) the battery will be preserved.
The manual prototype looks like this:


Note the red wire to drive the base of the transistor is stuffed into the battery holder for the picture. Once in operation this red wire will instead be the GPIO output from the 32u4.

Next, we need to make sure the remote is actually working! As mentioned in my previous blogs on M5Stack LoRa Range Issues as well as this fun project using OpenWRT on EA3500 with RTL-SDR Stream, I have an inexpensive NooElec SDR, that is simply amazing - particularly given the price! With this hardware, and the some software, we'll be able to "see" the remote signal.

The last time I used Cubic SDR, it was working fine. Today? Nothing. Erg. Gotta love Windows. App starts, no complaints, but no signal. A little bit of googling, and there's the Quick Start Guide. First thing I noticed was mention of my old friend, zadig. Sure enough: during one of the the Windows updates, the default driver was changed for some bizarre reason. Here's the screen just before correcting it:


And tada! Exit Cubic SDR (no need, at least for me, to reboot computer)... relaunch Cubic SDR app... then pressing Start for my RTL2832U device:


The waterfall immediately starts! Press the button on the remote a few times, and we can see the pulse at about 433.5 MHz. Notice the messy side-band noise, as well as someone else continuously transmitting at about 432 MHz:


I have the source code for all this on GitHub here: https://github.com/gojimmypi/LoRa-GPIO (note there are also Development and M5-RadioHead branches, but after a bunch of GitHub fussing, I think the master branch is now up to date). The projects are VisualMicro extensions to Visual Studio, but I suspect the Arduino code would work just fine in the Arduino IDE.

More to come...

Saturday, March 10, 2018

Single-Step Debugging the Uno ATMEGA328 (aka Arduino Uno) for the M5Stack LoRa

Today I revisit my old friend, the Microchip Atmel ATMEGA328P (aka Arduino Uno), although this is unlike any Arduino I've had before!

This is a continuation of my previous blog, where I am working on improving the range of LoRa on the ESP32-based M5Stack module. Many thanks to Jimmy Lai that sent me a prototype of the next version of LoRa module!


Note my LoRa board arrived with no headers soldered on. There's not really room for a typical install of the usual jumper headers due to how thin this the module is. I still used the standard header, but given the limited space, I inserted the plastic on the reverse side of the board and snipped off the pins on that side.


I soldered from above. I can't remember the last time I did this - if ever. One thing to keep in mind is to use as little solder as possible, as quickly as possible. The solder will want to wick up the post, making them ever-so-slightly thicker. Also - if there's a glob of solder at the bottom, the jumper wire won't fit all the way, and we're already a little on the short side from installing the header on the other side.


Ready to proceed with the fun stuff...

Upon close inspection of this new LoRa board, there's a tiny ATMEGA328P sitting there! (yes, the same micro-controller in the famous Arduino Uno (see typical Uno schematic).

Unlike a "regular" Arduino, there's no need to cut the trace for "Reset EN". (regular Arduinos programmed with the serial port have DTR connected to reset with a capacitor that otherwise interferes with ISP).

This Mega328 has the 28 pin, MLF form factor:


See the full ATMega328 spec sheet here. This Mega 328 LoRa board is connected like this:


As shown, the Mega328 sits between the ESP32 core and the LoRa RA-02 transceiver. So the plan is interrupt driven LoRa that the Mega328 handles, while I2C will be used to exchange data from the ESP32 core and the Mega328. So before doing anything, this sounds complex enough to need a serious debugger.

Fortunately I already had an Atmel ICE debugger and Atmel Studio 7 installed. As a reminder, here are the instructions:

First: ensure the latest version of Atmel Studio is installed via Help - Check for Updates (I am using Version 7.0.1645). It may also prompt you to update the firmware in the ICE Debugger. (1.27 in my case). See Tools - Device Programming.

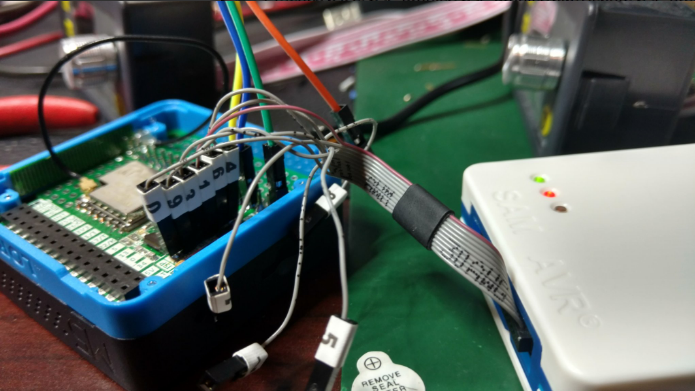
The most difficult thing is figuring out the pins to connect. Unfortunately the LoRa module has the ISP connections in a line rather than the standard connection. Adding to the frustration is the fact that the DuPont pins on the octopus cable have taped-on numbers. Although it is handy having the connections labeled, the thickness of the tape makes having 6 of them in a row a very tight fit:


As a feature request, I hope the M5Stack folks consider implementing a standard SPI / ICSP connector:

In the meantime, it would probably be worthwhile to create a custom inline Dupont header using a kit such as this and this crimping tool. (this is incredibly handy to have)

The single most important thing is that: MO = MOSI = TDI (I wasted a bunch of time when I had assumed MO = MisO = TDO; which is not correct!). Also note that nTRST != nSRST.  (yes, I made that mistake, too; my original screen clip did not include the SPI column which makes this more obvious).

These are the correct connections for debugWIRE, aka SPI, aka ISP programming of the M5Stack LoRa ATMEGA328P:


Note that VTG is not suited to power a remote device. This is a power sensor to determine logic voltage levels. Devices being debugged, including this LoRa module most be self powered!

For more information on the ICE Debugger, read the fine manual.

I started with a simple Uno sketch file:


void setup() {
  // put your setup code here, to run once:
  Serial.begin(115200);
}

void loop() {
  // put your main code here, to run repeatedly:
 Serial.println("hello");
}


Then in Atmel Studio: File - New - Project:


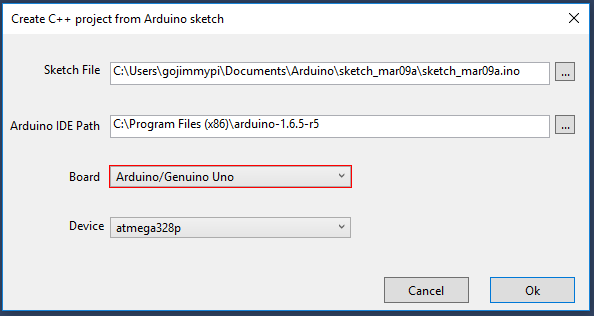
Select "Create project from Arduino sketch", edit directories as needed, then press ok.  Next select the file location of the Arduino sketch. Be sure to select Arduino/Genuino Uno for Board:


It may take a short while to create a project.


Once the project is created, click Project - {name} Properties (Alt-F7). Select Atmel ICE Debugger and ensure Debug Wire is selected for interface:


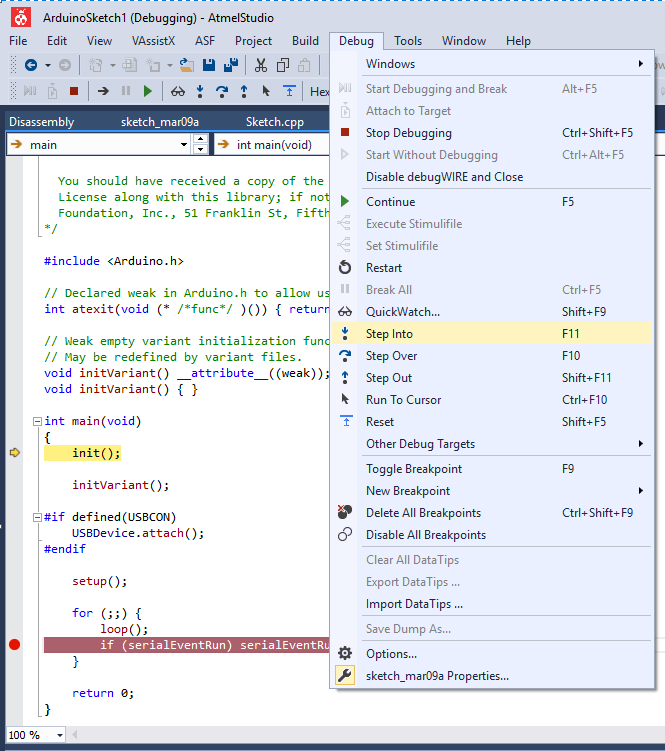
Next - click Debug - Step Into. The first time, there will likely be a warning about fuse settings:


Press Yes to set the fuses appropriately. If you get any other errors, check the wiring. Then recheck the wiring.

If successful, there will be a message that debugWIRE is enabled. BE SURE TO READ THE MESSAGE:


Note that you MUST power cycle the Mega328 (in our case the M5Stack & LoRa). Do not power cycle the Atmel ICE debugger.

Press ok, and VOILA!


I recall reading that the ATMega328 *must* have debugging properly disabled upon completion or Really Bad Things might happen (really?). I still do this, although I've never actually tested it to be sure. While paused at a breakpoint, click Disable debugWIRE and Close.


So the next step will be seeing if I can get the RadioHead drivers working on this new LoRa module... but first I'd like to get the LoRa AVR serial port working.


Resources, Inspiration, Credits, and Other Links:


Sunday, March 4, 2018

M5Stack LoRa Range Improvement


Last month I started working on a project to control GPIO pins on a device (relatively) very far away using LoRa technology. Most of the showstopper problems seem to have been resolved. Well, at least getting the RadioHead code working on the M5Stack. This blog entry continues on that topic...

TL;DR
  • VisualMicro Arduino projects in Visual Studio, using 32u4 (see also Adafruit 32u4) and M5Stack - both over LoRa.
  • M5Stack RSSI is a solid RSSI strength of 10 points worse than the exact same code on 32u4 which has the exact same RA-02 AI-Thinker LoRa device.
  • Recall from previous blog, LoRa RST and IRQ are reversed. (RST is actually GPIO36 input only; unusable). Otherwise it would have been: Beep = LoRa reset. 
  • M5Stack Speaker (GPIO25) is shared with LoRa Interrupt. (beep = interrupt?)
  • The M5Stack display shares the NSS pin with the LoRa module. (poke registers with care!)
  • The receiver and transmitter need to be configured EXACTLY the same for best range (more than just the same frequency); but this was not the problem with our poor RSSI
  • My LoRa-GPIO project and required RadioHead and M5Stack libraries merged to master on GitHub
  • When updating library (include) code, Visual Studio apparently does not look at file dates and may use previous compiled code; clean project after library changes.
The latest working (although not very pretty) Very Remote Lora-GPIO Control and Monitoring Project code has been merged onto my master branch.

I've merged my M5Stack development branch back to my RadioHead master branch. This was a "Squash and Merge". Normally I like to keep the history... but as the RadioHead owners prefer a single patch file, perhaps this will be better. Time will tell. History is still in the branch.

I've submitted a PR to Adafruit at their request, as well as well as sent a patch file to Mike at ReadioHead. Ok, this is weekend and evening working, certainly not some of my best polished work. I need to go back and clean things up.

My M5Stack library fork is, and has been up to date on the master branch. (no branches)

The main LoRa-GPIO solution contains several projects as noted in the GitHub readme. These are all Arduino-style projects using the really awesome VisualMicro add-in for Visual Studio.

As a side note, while working on this - I found what appears to be GitHub branch-to-branch compares not working properly.  (if it *does* work properly and I'm simply not doing it correctly, please let me know)

I've been reading through the ARRL Ham Radio License manual. I don't know if I will actually get a ham license, but wow - what a great book this is to cover the essentials of what you need to know for RF communications (such as the LoRa for this project). Although I had a ton of classes in college covering a wide variety of electronics, electromagnetism, communications, even an entire class on antenna theory... this ARRL book contains a lot of relatively straightforward, every-day language on the practical essentials of radio frequency communication - all in one place. The ARRL web site also has some excellent resources. Ok, there's also pretty much NO math, NO theory: Just useful facts. So this is certainly not a book for how or why or how to apply to new problem. Still, it is a quite good book. Highly recommended & would make a great gift for someone new to the field.

So on to the testing... now that I have the RadioHead drivers working, I actually went back to the M5Stack example code (Sandeep drivers renamed M5LoRa). Recall that I have the RadioHead drivers on a remote 32u4 sending LoRa packets. Here's the sample code for the M5Stack receiver (Arduino: File - Examples - M5Stack - Modules - LoRa - LoRaReceiver) :


#include 
#include 

#define LORA_CS_PIN   5
#define LORA_RST_PIN  26
#define LORA_IRQ_PIN  36

void setup() {
  
  M5.begin();

  // override the default CS, reset, and IRQ pins (optional)
  LoRa.setPins(LORA_CS_PIN, LORA_RST_PIN, LORA_IRQ_PIN); // set CS, reset, IRQ pin
  Serial.println("LoRa Receiver");
  M5.Lcd.println("LoRa Receiver");

  // frequency in Hz (433E6, 866E6, 915E6)
  if (!LoRa.begin(433E6)) {
    Serial.println("Starting LoRa failed!");
    M5.Lcd.println("Starting LoRa failed!");
    while (1);
  }

  // LoRa.setSyncWord(0x69);
  Serial.println("LoRa init succeeded.");
  M5.Lcd.println("LoRa init succeeded.");
}

void loop() {
  // try to parse packet
  int packetSize = LoRa.parsePacket();
  if (packetSize) {
    // received a packet
    Serial.print("Received packet: \"");
    M5.Lcd.print("Received packet: \"");

    // read packet
    while (LoRa.available()) {
      char ch = (char)LoRa.read();
      Serial.print(ch);
      M5.Lcd.print(ch);
    }

    // print RSSI of packet
    Serial.print("\" with RSSI ");
    Serial.println(LoRa.packetRssi());
    M5.Lcd.print("\" with RSSI ");
    M5.Lcd.println(LoRa.packetRssi());
  }
}

This code writes to  both the M5Stack display as well as the serial port. The display is cool as I don't need to remember to disconnect the serial port when reprogramming. HOWEVER: You may recall from my previous blog that the M5Stack display *and* LoRa module share the NSS (slave select) pin. That simply sounds dangerous (and indeed I observed some display oddities), so I put M5Stack LoRa to sleep when writing to the display.

The shocking thing here is that there's up to a difference of TEN in RSSI values as compared to using the RadioHead drivers. (RSSI 36 vs 26). As this is a log scale, that's a 10x difference in power! Now - this is not to say that the Sandeep library has a problem just because it is polling rather than using interrupts. It is a matter of default configuration. I picked apart the RadioHead control register libraries and added a note about the matching importance:


When printing the register values from the Sandeep (M5LoRa) library, (move the readRegister from the private to public section)...

    Serial.print("0x");
    Serial.print(LoRa.readRegister((uint8_t )0x1d),HEX);
    Serial.print(", 0x");
    Serial.print(LoRa.readRegister((uint8_t )0x1e),HEX);
    Serial.print(", 0x");
    Serial.print(LoRa.readRegister((uint8_t )0x26),HEX);


There's a SINGLE BIT different (CRC not enabled!):  0x72, 0x70, 0x4 - alas that didn't seem to make much of a substantial difference in RSSI values. I supposed I had expected different error coding, spreading factor, or some other obvious difference.

I confirmed the running values of RadioHead cinfig registers are also 0x72, 0x70, 0x4 - but the RSSI is typically -25 whereas the Sandeep (M5Lora) drivers report an RSSI of typically -35!

So the next thing is: how to each of them calculate RSSI?


Well, the Sandeep / M5Lora library does this:

int LoRaClass::packetRssi()
{
  return (readRegister(REG_PKT_RSSI_VALUE) - (_frequency < 868E6 ? 164 : 157));
}

float LoRaClass::packetSnr()
{
  return ((int8_t)readRegister(REG_PKT_SNR_VALUE)) * 0.25;
}

But the RadioHead library does this:
// Remember the last signal to noise ratio, LORA mode
// Per page 111, SX1276/77/78/79 datasheet
_lastSNR = (int8_t)spiRead(RH_RF95_REG_19_PKT_SNR_VALUE) / 4;

// Remember the RSSI of this packet, LORA mode
// this is according to the doc, but is it really correct?
// weakest receiveable signals are reported RSSI at about -66
_lastRssi = spiRead(RH_RF95_REG_1A_PKT_RSSI_VALUE);
// Adjust the RSSI, datasheet page 87
if (_lastSNR < 0)
 _lastRssi = _lastRssi + _lastSNR;
else
 _lastRssi = (int)_lastRssi * 16 / 15;
if (_usingHFport)
 _lastRssi -= 157;
else
 _lastRssi -= 164;


Grr... So ok, the difference in RSSI appears to be simply a different calculation.  The real test is: how far away can the units be and still communicate? I'm still happy I have the RadioHead libraries working. In my opinion is is clearly the superior code.

So reference check: after all the code changes, let's try same units: 32u4 to 32u4. Cleaned project, full rebuild. RSSI value is -19 or -20! Rechecking the M5Stack, RSSI is -27.  So even with the same codebase and same calcs, the M5Stack LoRa has a poorer RSSI value. Using an external battery power source and the value improves to RSSI = -24.

So, as mentioned about - I've been reading about real world antennas, so perhaps the M5Stack antenna has an issue. Well, I tried that as well, replacing the internal antenna with one of those external antennas - identical to the one on the 32u4. Still there's a discrepancy in RSSI values between the two devices.

What else? Ok, so there's a speaker in the M5Stack. Poking around with that, defined in:

libraries\M5Stack\src\utility\Config.h

there's a declaration:

// BEEP PIN
#define SPEAKER_PIN 25

Ah yes, GPIO25, our friend. The LoRa interrupt pin.  (sigh)

So perhaps all the extras in the M5Stack are indeed causing a problem. I tried to disable a few things  such as the speaker init, but no luck. I do however, have another Console (without display) app that is specifically targeted for the 32u4, but with the magic of simply changing platforms in the IDE, can be recompiled and sent to the M5Stack!  RSSI about that same at -27 (ranging from -23 to -29).  Replace with the exact same code on the 32u4 and the RSSI is a full 10 points better at -17.  (10x improvement in signal strength!).

I tried another M5Stack unit with a different LoRa module. Same result.

So at this point, I really believe it is a hardware issue. I've been unable to get a copy of the schematic for the M5Stack LoRa module, However the 32u4 has a pin connection diagram here.

As soon as hardware is questioned - the first thing to do is of course add some capacitors! I added a 10uF and a 10pf cap directly to the power input to the RA-02.


In the pic, you can see I fished a new, external antenna along with the new caps. And ya, I got a little close to the side of the M5 Lora module.

Additionally I added a shield (aluminum foil sandwiched between two layers of clear packing tape) to both sides of the LoRa module. After all - there is an ESP32 microprocessor buzzing away just on the other side of the PCB!


The first field test was a relative success! I more than doubled the original range! Ok, so I didn't actually test after each change, so I don't know exactly which was the most effective in extending the range.

Note the Semtech site has a bunch of LoRa resources, including this cool LoRa calculator (I will include in my GitHub repository in the docs container, in case the link to Semtech ever breaks.


Note that I am currently transmitting at 125kHz. Lowering this increases range! Lower this to about 15.6kHz and you get another 10db in "link performance". (in theory).

Overall I am quite happy with the result. Ok, I'm not seeing multi-kilometer ranges. But that's also line-of-sight. My transmitter is on the kitchen table - with the entire garage between it and the M5Stack receiver. Next test will be from line of site.

The super exciting thing is I have a prototype from the kind folks at M5Stack arriving in the mail soon for the next potential version of the LoRa module. I am quite interested in seeing how well it performs.

Stay tuned for my next blog where I work on the prototype V2 LoRa modules with its own embedded ATMEGA328.


Resources, Inspiration, Credits, and Other Links:


Saturday, March 3, 2018

LoRa Range Issues

This is a continuation of my previous blog: M5Stack LoRa Range Issues.


TL;DR
  • The M5Stack LoRa is using Sandeep drivers (polling) whereas RadioHead drivers use interrupts.
  • The M5Stack LoRa board has IRQ/RST reversed! IRQ DIO0 is actually connected to GPIO26. RST is actually connected to GPIO36, but is useless since GPIO36 is input only.
  • The M5Stack display shares NSS on GPIO5; LoRa needs to be put to sleep when updating display. (Mutex likely needed in FreeRTOS)
  • SemTech SX1276/77/78/79 == HopeRF RFM95/96/97/98 (almost exactly the same pages!)
  • Various links on Lora, installing libraries, etc

When considering performance, be sure to check out this excellent YouTube video: #182 ESP32 Lora Boards: What you need to know before you buy (incl. Antenna knowledge) - thanks Mark West @TheFlyingZephy for pointing this out)


There are a variety of LoRa libraries:


Plus this interesting  LoRa.py gist

My LoRa32u4 is using the RadioHead libraries; The M5Stack uses a slightly modified Sandeep library. A pair of LoRa32u4 units work great. A LoRa32u4 sending to M5Stack - not so great. So I'm attempting to use the RadioHead library with the M5Stack.

To install M5Stack library with ability to save in GitHub and submit pull requests. First fork the project to your own GitHub repository. Then clone it to your Arduino library (in my case, gojimmypi user)

cd C:\Users\gojimmypi\Documents\Arduino\libraries\
git clone https://github.com/gojimmypi/M5Stack.git
:: optionally get RadioHead drivers from Adafruit
:: ren RadioHead RadioHead-stock
git clone https://github.com/gojimmypi/RadioHead.git


cd C:\Users\gojimmypi\Documents\Arduino\libraries\
mkdir temp-adafruit
cd temp-adafruit
git clone https://github.com/adafruit/RadioHead.git
cd RadioHead
xcopy *.* ..\..\RadioHead\*.* /s /d
:: reminder to delete temp-adafruit


In my case, after the fork from Adafruit, I deleted everything (except hidden .git directory, of course) and copied back the contents of the RadioHead-stock directory so we could use Visual Studio diff (right-click, Compare with Unmodified). Not unexpected, the RadioHead I had was older. So I fetched the Adafruit into a temp directory, then copied it back:

See https://github.com/gojimmypi/RadioHead/tree/M5Stack (this is the branch with my active edits for M5Stack LoRa)

I've created a branch to submit changes back to the RadioHead master. Note that for contributions, special instructions are needed since they are not using GitHub. I also have a PR back to Adafruit.

Visual Studio users will be happy to know there's a feature to use File Explorer; right click on the directory and select "open in Visual Studio". With the GitHub extension installed, there's a very nice GUI for GitHub.

I have yet to figure out branch-to-branch compares on GitHub and have opened this issue.

To add the RadioHead libraries to an M5 Stack project: vMicro - Add Library - User - RadioHead:


After spending a ton of time trying to get the RadioHead drivers working, first I found that that M5Stack base I was using had completely inoperable GPIO35 and GPIO36 pins. After swapping that out for a new one... and even more time spent trying to get RadioHead drivers working - I discovered another WIRING problem. <sigh> Connections to GPIO26 and GPIO36 are reversed! Not all coding problems are based solely in software.

Here's the corrected M5Stack LoRa pinout diagram:


Note that the RST (reset) input to the RA-02 LoRa device won't actually reset, as GPIO36 is input only!

Many thanks to Jimmy Lai at M5Stack for sending me a prototype of their next version of LoRa. Looking forward to my next gizmo in the mail :)

So now that I actually have the RadioHead drivers working with the M5Stack... now on to actual performance testing in my next blog.


Resources, Inspiration, Credits, and Other Links:

Monday, February 12, 2018

M5Stack LoRa Range Issues

Investigating 32u4 to M5Stack LoRa poor range issues; Background information & initial tool setup.

Well, after my last post regarding the fascinating world of FPGA programming, I really thought this next post would continue on that topic. I really want to try out Luke's tiny FPGA board. Alas I've encountered another issue on a project that warrants sharing and someplace for me to keep my notes.


TL;DR

  • Misc details and notes on LoRa
  • VisualMicro ESP32 USB Debugging caused by new driver version
  • NESDR issue with SDR software and driver install
  • LoRa Range issue still unresolved, stay tuned for part 2


Late last year, I finally decided to buy a couple of "DIYmall LoRa32u4 LORA RA-02 Module Development Board Long Range Communication 1KM LiPo Atmega328 SX1278 with IPEX Antenna for Arduino" devices when Amazon had one of their "Lightening Deal of the Day" sales. Not to be confused with LoRaWAN - these are simple serial-type broadcast devices but with very long range. Getting them to talk to each other was ridiculously easy mainly thanks to the great Adafruit Feather 32u4 with LoRa Radio Module tutorial and sample code.

Perhaps there's some software to do LoRaWAN with these (if anyone knows, let me know ) - however I don't have any service providers nearby and the gateways are expensive.

edit 2/18/18: here's a video on creating a LoRa gateway:


By the time my LoRa modules arrived, I had forgotten the title explicitly called out the "RA-02 Module". In hindsight, I'm surprised the Adafruit code worked at all, given their description naming their LoRa device as a Adafruit Feather 32u4 LoRa (RFM9x).  Apparently the RA-02 and RF95 libraries are "close enough" - as my 32u4 appears to have the exact same RA-02 module as used on the M5Stack LoRa module. (I wonder what, exactly is on the Adafruit device?)

Which reminds me: be sure to check the frequency of the respective LoRa devices: they need to match not only each other, but also be allowed in respective county of use!

  (source: RF Wireless World)

After having the proof of concept working with the two 32u4 devices (RadioHead RFM95 libraries)  - which I was able to show them working hundreds of meters apart through very obstructed signal path and certainly not a straight line-of-site (e.g. hill, buildings, trees, etc)... I thought it would be cool to have a display module on one end, controlling the GPIO's on the other.

Some time ago, I had ordered an ESP32-based M5Stack so I decided to use this for a "console" along with their LoRa Module to talk to a very remote 32u4. Seems simple enough in concept, eh? Ha! Nothing is ever as easy as is is supposed to be.

First, the M5Stack core library uses different Sandeep Mistry LoRa drivers. (see also github) Thinking that "LoRa is LoRa", I assumed that they would work together. Indeed the workbench test was a complete success the first time.

However, the first real field test was a disaster. Taking the dog for a walk with an M5Stack connected to USB battery pack in hand, I expected to be tweeting success far from home. I was barely out of WiFi range across the street when the M5Stack stopped receiving messages from the 32u4. Certainly a long way from kilometer LONG Range.

As it turns out, KongDuino recently left a rather interesting blog review of the M5Stack and LoRa modules. It would seem that I'm not the only one with LoRa range problems. If it was easy, it wouldn't be any fun - right?

Note that the 32u4 devices use so little power, that the Anker portable power supply turns off after a few minutes - perhaps thinking nothing is actually connected. Perhaps a USB hub or something might help for a road trip with it.

I've posted my code on GitHub under a project called LoRa-GPIO. This is a pitiful hack of sample code, but an otherwise operational proof of concept of the 32u4 transmitting a signal for the M5Stack to receive and display.

So to investigate the range issues, we'll need some tools such as break-point debugging and signal analysis.

Note for anyone using VisualMicro for development (like me). If any problems are encountered debugging the ESP32, be sure to check the CP210x USB driver version - particularly just after Windows Updates. There's apparently a known problem with recent drivers not working, Simply select (or install as needed) an older version to fix:


Ok, so anytime there's a signal transmission issue at hand, it is helpful to have some visualization tools. I have the inexpensive Nooelec Smart SDR on hand.

See Using SDR Sharp Quick Start Guide. Download Windows SDR Package from https://airspy.com/download/  Need to disable new security feature that prohibits unsigned drivers.

bcdedit /set testsigning on

Reboot. To turn off:
bcdedit /set testsigning off

Even running zadig as administrator, I was unable to change drivers. So ok, I guess I needed to download new driver installer from the Nooelec Getting Started.  Windows is brutal; it completely removed the prior SDR drivers I had installed and working. Grr,,,

SDR Sharp had complained about the Visual Studio 2015 C++ runtime not being able to be installed (I have Visual Studio 2017 installed)... so rather than fuss with that, I installed the CubicSDR 0.2.2 software also located at the bottom of the Nooelec Getting Started with NESDR page.

Note there's an entire CubicSDR web site, and the most recent version appears to be v0.2.3 released in January of this year (2018) complete with source code on GitHub.

Once finally installed, the LoRa signal can be visualized:


So, ok.. I've fussed with Visual Studio debugging, SDR software install, and typing up all these notes and most of the day has flown by. No progress today on the actual problem of poor LoRa range. Clearly a part two is due and coming soon...


Find gojimmypi at gojimmypi.github.io

I'm currently working on my new blog home at  gojimmypi.github.io After implementing a variety of features such as dark mode , syntax hi...