Over the weekend I received my new
Arduino MKR-WiFi-1010 (the ABX00023) that I purchased from
Amazon, as seen here along with my
Atmel ICE:
Warning: after writing this blog I realized that using the Atmel ICE can end up causing problems with the bootloader when later attempting to upload a sketch via the serial port! This was
easily resolved (everything is easy, when you know how), but beware.
Update: I wrote this
blog on Burning Bootloader from Visual Studio with Atmel Ice for the Arduino MKR WiFI 1010.
Ironically, I found this board shortly after commenting to
Peter Scargil that
I really didn't think anything could replace the Espressif ESP8266 (other than the ESP32) since it has been around for so long and has such a strong community and momentum. I found the 1010 shortly after seeing a
tweet from MicroChip regarding the ATMega4809. (an 8-bit Arduino, 16MHz ceramic resonator, WiFi board using the ECC608 Crypto-Authentication chip for $44.90). The MKR1010 (32 bit!) was listed as "related product". Now, I knew the MKR-1010 board had been released some time ago - but at the time I seem to think it was rather expensive and didn't think much more about it. However at $29.90 - that's just too appealing to pass up. Amazon prime to the rescue for me gizmo addiction: delivered the next day at no extra change! Thank you Prime!
It has been some time since my last blog post. I have a draft blog of some things that I learned with
my new CNC, but it is rather messy at the moment, so instead this weekend I am back to debuggers and this MKR-1010 board.
One of the main points of interest with this board - is that in addition to the SAMD21 (specifically the ATSAMD21G18A) it
also has an on-board ESP32 ...
and the MicroChip ECC508 Crypto-Authentication chip! Although I really like the ESP8266 boards, I will say that JTAG debugging was not exactly the easiest and most robust, as noted
here and
here. One thing about the Atmel ICE is that in Atmel Studio, it is a fairly robust and reliable hardware debugger.
So fresh out of the gate, I was
disappointed that I did not have a cable for (what I thought) was the Single Wire Debug (aka SWD) connector:
 |
| Comparing a 50 mil connector to what I thought was the SWD connector. |
Note that black connector not a 0.1 pin spacing, it is already the small 50 mil connector that is on the Atmel ICE. The white connector below
is even smaller than that!
I spent an embarrassingly long time scouring the internet for anything I could find on "Arduino MKR 1010 SWD Debugging Connector". I could not even determine what that tiny white connector is called so that I could order one. I even
posted a plea for help on the
Arduino MKRWiFi1010 forum,
Eventually, I found
this post where someone was asking about connecting the Atmel ICE SWD to the MKR-ZERO. Although I had no indication the 6 pads on the underside of my MKR-1010 were actually the J2 SWD pins, I was hopeful that the folks at Arduino would have standards and consistency.
 |
| Schematic diagram for MKR-1010 SWD Connector (pads on reverse) |
The Maker Zero SWD pins are as shown here, in this diagram provided by
Federico_Vanzati:
 |
| MKR-Zero SWD Pins for Atmel ICE |
Keep in mind I had no experience, no knowledge of the MKR-Zero, however the MKR WiFi 101 is just a bit similar, once you see them both, eh?
 |
| MKR-1010 board from the Arduino site |
So although I was confident and hopeful that I could finally get the Atmel ICE to connect, I was still stuck with 6 pads and no holes. I really wish the Arduino folks would have made a more debug-friendly connector.
Fortunately, I had some of those snap-apart headers on hand. I bent two sets of 3 pins...
 |
| Header with some pins bent for the surface-mount SWD pads. |
...and stuck them both into a 6-pin cable connector to hold them in the proper position for soldering:
 |
| Preparing the home-made surface mount headers in a 6 pin connector. |
Be sure that the longer header pin is not pulled through when bending them: Not only do you want to have a good length for electrical contact, but you also don't want them too long on the PCB. Yes, there's a solder mask layer that should act as an insulator, but I would not count on it. Make sure that pins are only as long as the solder pads. I needed to trim mine.
Note that using sets of three will increase overall mechanical strength - but as they are surface mounted, care should be taken when inserting & removing connections.
So the reality of annoying future breadboard use becomes quite apparent once the header is soldered in place. Clearly the designer prioritized the Arduino logo over the practicality of pad header placement:
 |
| My MKR-WiFi-1010 SWD Header Connection, freshly soldered on |
I'm thinking if I plug it into a breadboard, I'll just use some of those stackable headers. Still, this will leave many more mechanical connections and many more places for connection problems.
From the MicroChip / Atmel ICE docs - these are the pins used for SWD on the SAMD21 chips:
 |
| SAMD Pins for SWD Debugging with Atmel ICE (from the User Guide) |
Upon reading the pinouts and looking at the cables and adapters that I have for the Atmel ICE, I realized that my only option was to use that handy-but-annoying Squid Cable.
 |
| Arduino MKR WiFi 1010 with SWD Atmel ICE Pin Numbers shown. |
Here's what the board looks like connected to the Atmel ICE:
 |
| Arduino MKR-WiFi 1010 connected to Atmel ICE with the Squid Cable. |
I sure wish a simple 10-pin header would have been installed on the MKR boards - that would connect directly to the Atmel ICE debugger. Well, no worries.. good to go!
There's a MKR-Wifi-1010 tutorial on actually using the WiFi
here on GitHub. I actually used the
WiFi tutorial page to get started. I took the ino file and pasted it into the Arduino IDE and compiled to ensure everything was working properly. Then I created a new Atmel Studio project from the ino.
 |
| Atmel Studio setup step 1. |
And on the next screen, select the location of the ino project from the Arduino IDE:
 |
| Atmel Studio setup step 2. |
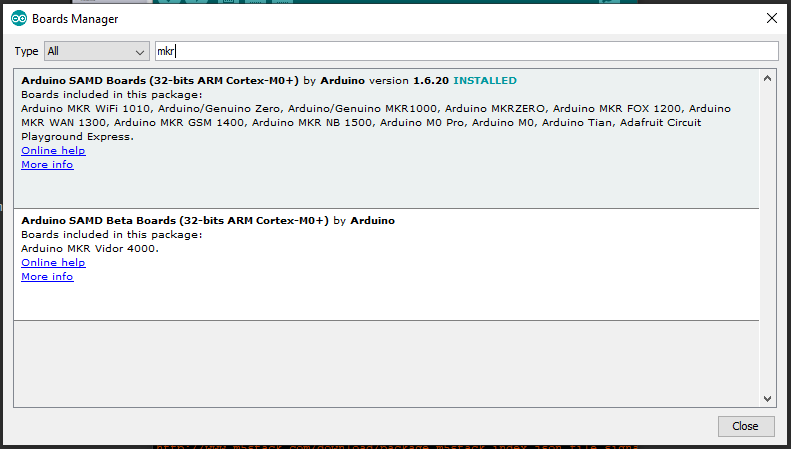
Edit Feb 2019: If you don't see the board listed, then launch the Arduino IDE and ensure it is installed via Tools - Board - Board Manager:
Type "MKR" to shorten the list:
/Edit... back to Atmel Studio:
Connection in Atmel Studio is pretty straightforward, just select the Atmel ICE and ensure "SWD" is used:
 |
| Atmel Studio SWD Debugger Settings for Atmel ICE |
After that... voila! Click the Debug menu and step in, set breakpoints, and more!
One thing that is not super obvious when debugging with the Atmel ICE, is most sample code is "wait forever until serial port available" during setup. Well, the Atmel ICE is not the serial port!
  //Initialize serial and wait for port to open:
  Serial.begin(9600);
  while (!Serial) {
    ; // wait for serial port to connect. Needed for native USB port only
  }
So be sure to connect something to the serial port! The serial monitor in Atmel Studio is a bit wonky. I simply use
putty.
See the Disassembly tab to view the assembly language generated from the source code:
The Processor button show interesting information:
Also cool to browse and inspect I/O registers:
This is SO much better than a zillion serial.println statements!
Well, I hope this saves you the hassle I encountered when trying to use the Atmel ICE hardware debugger with the Arduino MKR-WiFi 1010.
I've added a
MKR-WiFi-1010 GitHub Repository with the source code and relevant pictures and documentation.
So ya, perhaps this Arduino will take over the Espressif chips ... but as there's an Espressif on-board this guy, perhaps that's not a fair comparison. Still - it is a quite interesting board at a somewhat reasonable price.
Resources, Inspiration, Credits, and Other Links:
Please leave comments, ideas, suggestions below (moderated, sometimes delayed) or send me a message at gmail, or find
me on twitter.