Showing posts with label ujprog. Show all posts

Tuesday, February 12, 2019

ULX3S - ujprog on Windows WSL or MingGW

I continue to learn about my latest gizmo that arrived all the way from Croatia - the ULXS3. (see my prior blog)

TL;DR; @emard has precompiled binaries. Otherwise compile your own ujprog using apt-get install mingw-w64. A specific makefile is needed to use the new compiler. The current f32c repo has a very old 32-bit ftd2xx.lib; the updated 64 bit version will typically be needed on modern machines. New drivers are here. The ujprog and OpenOCD for ULX3S cannot be used concurrently (FTDI vs libusbK drivers). See the ujprog README that I created.

I've been trying to use WSL for FPGA development. I'm primarily a Windows developer for the Day Job. I like the Windows tools - particularly Visual Studio and VS Code. I also simply think WSL is really cool. (see also WSL on GitHub)

As a reminder, do not modify WSL filesystem file from Windows! Yes, I've seen some pretty weird things happen when I tested that. But feel free to edit any other files. For instance, the entire C:\ directory is available in WSL as /mnt/c/.

Note that similar to the TinyFPGA setup script, I also created a ULXS3 Setup Script.

One of the problems with WSL is the lack of native USB support (glaring omission, I know). So I wanted to see if the ujprog JTAG programmer could be used from Windows. Not super cool having a disjointed environment. For example, when creating the ujprog in WSL:
git clone https://github.com/f32c/tools.git f32c_tools
cp Makefile.linux Makefile
make
./ujprog -t
I see this result:

$ ./ujprog -t
ULX2S / ULX3S JTAG programmer v 3.0.92 (built Feb 12 2019 10:14:16)
Cannot find JTAG cable.

If compiling ujprog for Windows (yes, I admit I tried to type make at a DOS prompt - lol!), install MinGW (I downloaded mine from here; the downloads link however points here). See the wiki: HOWTO Install the MinGW GCC Compiler Suite.


Press "Continue" and upon completion:


Then the MinGW install manager runs:


I chose these options:


Then click "Installation - Apply Changes"


When finished, there should be an indication that "all changes applied successfully"


From Windows, run:

C:\MinGW\msys\1.0\msys.bat


The MINGW32 home directory (from the Windows perspective) will be: C:\MinGW\msys\1.0\home\{your user name}

Unlike other bash prompts, this one does not seem to map the entire C:\ drive, so I re-cloned the repo to my home/workspace directory in MinGW32:

mkdir workspace
cd workspace
git clone https://github.com/f32c/tools.git f32c_tools

Try to compile the linux make file:

cp Makefile.linux Makefile
make

of course results in failure:

$ make
cc -Wall -D__linux__  -static ujprog.c /usr/lib/`uname -m`-linux-gnu/libftdi.a /usr/lib/`uname -m`-linux-gnu/libusb.a -o ujprog
/bin/sh: cc: command not found
make: *** [ujprog] Error 127

Try to compile the win make file (copy the respective Makefile so the -f is not needed every time):

cp Makefile.win Makefile
make

results in a bunch of warnings repeated about usleep, but more importantly a critical error: 'EOPNOTSUPP' undeclared as shown here:

In file included from ujprog.c:55:
[... snip ...]
c:\mingw\include\unistd.h:100:29: note: declared here
 int __cdecl __MINGW_NOTHROW usleep( useconds_t )__MINGW_ATTRIB_DEPRECATED;
                             ^~~~~~
ujprog.c: In function 'shutdown_usb':
ujprog.c:621:2: warning: 'usleep' is deprecated [-Wdeprecated-declarations]
  ms_sleep(10);
  ^~~~~~~~
In file included from ujprog.c:55:
c:\mingw\include\unistd.h:100:29: note: declared here
 int __cdecl __MINGW_NOTHROW usleep( useconds_t )__MINGW_ATTRIB_DEPRECATED;
                             ^~~~~~
ujprog.c: In function 'exec_svf_tokenized':
ujprog.c:1488:9: error: 'EOPNOTSUPP' undeclared (first use in this function); did you mean 'WSAEOPNOTSUPP'?
   res = EOPNOTSUPP;
         ^~~~~~~~~~
         WSAEOPNOTSUPP
ujprog.c:1488:9: note: each undeclared identifier is reported only once for each function it appears in
ujprog.c: In function 'async_read_block':
ujprog.c:2788:4: warning: 'usleep' is deprecated [-Wdeprecated-declarations]
    ms_sleep(backoff * 4);
    ^~~~~~~~
In file included from ujprog.c:55:
[... snip ...]
I tried making the changes described in nmap/nmap#183 - specifically adding to ujprog.c:

#undef EOPNOTSUPP
#define EOPNOTSUPP      WSAEOPNOTSUPP  /* Operation not supported */

And Voila! Success! ujprog.exe for Windows! I created issue this f32c/tools/#8 and this PR f32c/tools#9 to help others that may encounter this problem.

I'm not sure this PR will be accepted, as the root cause may be:
 probably including a wrong errno.h
When running ujprog.exe (from either MinGW32 bash prompt, or DOS command prompt):

ULX2S / ULX3S JTAG programmer v 3.0.92 (built Feb 10 2019 15:25:08)
Usage: ujprog [option(s)] [bitstream_file]

 Valid options:
  -p PORT       Select USB JTAG / UART PORT (default is 0)
  -P COM        Select COM port (valid only with -t or -a)
  -j TARGET     Select bitstream TARGET as SRAM (default) or FLASH (XP2 only)
  -f ADDR       Start writing to SPI flash at ADDR, optional with -j flash
  -s FILE       Convert bitstream to SVF FILE and exit
  -r            Reload FPGA configuration from internal Flash (XP2 only)
  -t            Enter terminal emulation mode after completing JTAG operations
  -b SPEED      Set baudrate to SPEED (300 to 3000000 bauds)
  -e FILE       Send and execute a f32c (MIPS/RISCV) binary FILE
  -x SPEED      Set binary transfer speed, optional with -e
  -a FILE       Send a raw FILE
  -d            debug (verbose)
  -D DELAY      Delay transmission of each byte by DELAY ms
  -q            Suppress messages

This seemed to be a convoluted solution (hm. as always). So a bit of googling and I found a stackoverflow regarding using MinGW for Ubuntu. Something a little more direct from WSL:
sudo apt-get install mingw-w64
It is however, massive, at nearly 750 MB:
Reading package lists... Done
Building dependency tree
Reading state information... Done
The following additional packages will be installed:
  binutils-mingw-w64-i686 binutils-mingw-w64-x86-64 g++-mingw-w64 g++-mingw-w64-i686 g++-mingw-w64-x86-64
  gcc-mingw-w64 gcc-mingw-w64-base gcc-mingw-w64-i686 gcc-mingw-w64-x86-64 mingw-w64-common mingw-w64-i686-dev
  mingw-w64-x86-64-dev
Suggested packages:
  gcc-7-locales wine wine64
The following NEW packages will be installed:
  binutils-mingw-w64-i686 binutils-mingw-w64-x86-64 g++-mingw-w64 g++-mingw-w64-i686 g++-mingw-w64-x86-64
  gcc-mingw-w64 gcc-mingw-w64-base gcc-mingw-w64-i686 gcc-mingw-w64-x86-64 mingw-w64 mingw-w64-common
  mingw-w64-i686-dev mingw-w64-x86-64-dev
0 upgraded, 13 newly installed, 0 to remove and 1 not upgraded.
Need to get 127 MB of archives.
After this operation, 744 MB of additional disk space will be used.
So after the install, a quick compile resulted in:
gcc.exe -c ujprog.c -o ujprog.o -I.
make: gcc.exe: Command not found
Makefile:29: recipe for target 'ujprog.o' failed
make: *** [ujprog.o] Error 127
Ah yes, of course. The Makefile needs to be adjusted to use the new mingw compiler (I added to my PR, suggesting to include a new Makefile.ming32_64:
# Project: ujprog

CPP  = x86_64-w64-mingw32-gcc
CC   = x86_64-w64-mingw32-gcc
WINDRES = windres.exe
RES  =
OBJ  = ujprog.o $(RES)
LINKOBJ  = ujprog.o $(RES)
LIBS = -s -static -L. -lftd2xx
INCS = -I.
CXXINCS = -I.
BIN  = ujprog.exe
CXXFLAGS = $(CXXINCS) -wAll
CFLAGS = $(INCS)
RM = rm -f

.PHONY: all all-before all-after clean clean-custom

all: all-before ujprog.exe all-after


clean: clean-custom
        ${RM} $(OBJ) $(BIN)

$(BIN): $(OBJ)
        $(CC) $(LINKOBJ) -lftd2xx -o "ujprog.exe" $(LIBS)

ujprog.o: ujprog.c
        $(CC) -c ujprog.c -o ujprog.o $(CFLAGS)

The next problem was the ftd2xx.lib file was meant for Linux not Windows, 32 bit not 64 bit .

$ make
x86_64-w64-mingw32-gcc -c ujprog.c -o ujprog.o -I.
x86_64-w64-mingw32-gcc ujprog.o  -lftd2xx -o "ujprog.exe" -s -static -L. -lftd2xx
/usr/bin/x86_64-w64-mingw32-ld: skipping incompatible ./ftd2xx.lib when searching for -lftd2xx
/usr/bin/x86_64-w64-mingw32-ld: cannot find -lftd2xx
/usr/bin/x86_64-w64-mingw32-ld: skipping incompatible ./ftd2xx.lib when searching for -lftd2xx
/usr/bin/x86_64-w64-mingw32-ld: cannot find -lftd2xx
collect2: error: ld returned 1 exit status
Makefile:26: recipe for target 'ujprog.exe' failed
make: *** [ujprog.exe] Error 1
Searching my entire drive, I found the Windows DLL version in my C:\downloads\FTDI directory. Specifically from the WSL perspective:
cd ~/workspace/f32c_tools/ujprog
cp '/mnt/c/download/FTDI/CDM v2.12.28 WHQL Certified/amd64/ftd2xx.lib' ./ftd2xx.lib
make clean
make
This successfully compiled the Windows exe, leaving the file in the Windows-equivalent of my Ubuntu directory:
C:\Users\gojimmypi\AppData\Local\Packages\CanonicalGroupLimited.UbuntuonWindows_79rhkp1fndgsc\LocalState\rootfs\home\gojimmypi\workspace\f32c_tools\ujprog
Sadly, I received the same error in Windows as I did in WSL:
ULX2S / ULX3S JTAG programmer v 3.0.92 (built Feb 12 2019 17:48:54)
FT_Open() failed
Cannot find JTAG cable.
I later discovered this problem was a Windows device driver conflict. In my prior blog, I got OpenOCD working. It uses the libusbK drivers. However, ujprog.exe uses the FTDI drivers. Changing the Windows drivers back to FTDI allows the freshly compiled app to work from Windows!

Now on to getting more serious by uploading my own FPGA and ESP32 code. I'll need to be super sure I can get back to "as shipped" FPGA image, otherwise I may not be able to program the ESP32 since it is not connected directly to any of the exposed pins, rather only the FPGA (same with the SPI display). Thus a passthru app is needed:
Yes, if ESP32 needs FPGA as bypass logic to OLED. If you need ESP32 to write to OLED while FPGA is running user defined core then those few OLED bypass signals must be copy pasted from passthru source to user's source. It's makes very small LUT usage.
--@emard
More info coming soon!

Resources, Inspiration, Credits, and Other Links:

Saturday, February 9, 2019

ULX3S - Day 1

I first learned about the ULX3S via the Hackaday Article last month. (see also hackster.io) There was an offer for boards at the bottom of the radiona.org ulx3s page, so I promptly contacted them. There was only one 12F board left (I confirmed mine is the latest v3.0.3 version), and without the ESP32 connected. Goran was so kind: he not only soldered on the ESP32, but he also included a sticker, headers, the SPI display, and even an awesome 3D-Printed case! (for those that follow me - you know my ongoing quest to find good enclosures for projects)

My board arrived all the way from Croatia, and just in time for the weekend! Power-on success is always a good start:


One of the first things I noticed is that there are TWO micro-USB ports:

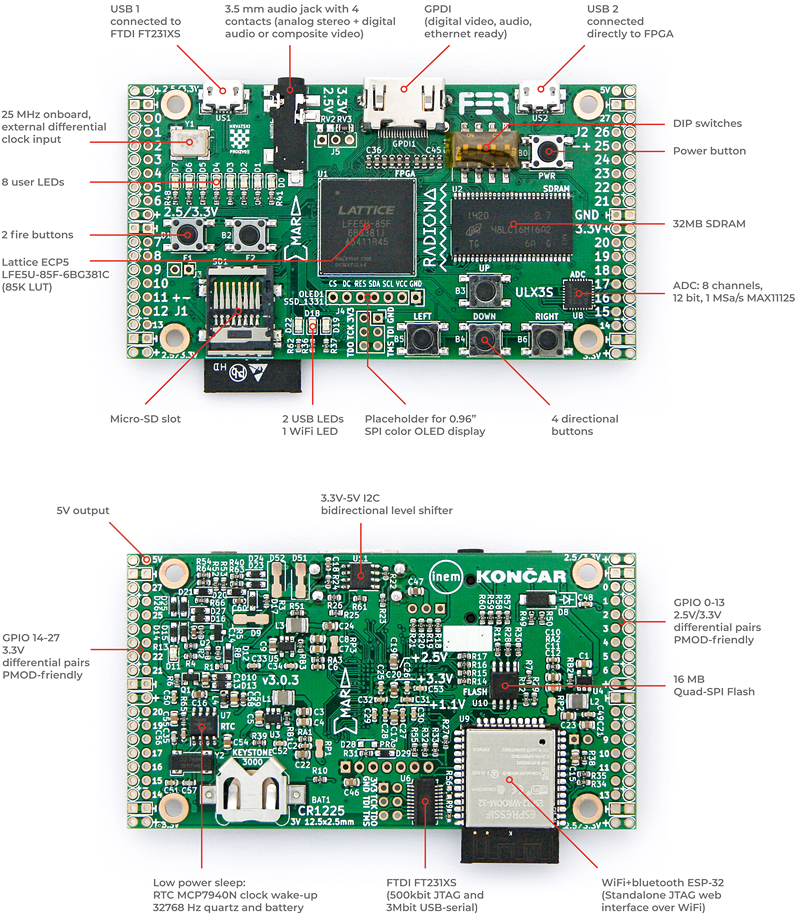
ULX3S Board Diagram, from http://radiona.org/ulx3s/
One of them is used for JTAG, connected to a  FTDI FT231XS chip. The other is "connected directly to FPGA". Despite having reviewed the online documentation prior to board arrival, I admit I was surprised to see the two USB connectors. (Uh-oh; which do I use?? will there be ground-loop problem if I use them both?) The feature list only names the one used for JTAG, but both are of course clearly labeled on the diagram (see above); Interesting how one sees things differently when actually holding the physical item.

There are a bunch of interesting links for the ulx3s here.

I received a suggestion that I should first test board with this repo: github.com/emard/ulx3s-bin

There's some information on using JTAG with the ULX3S here: github.com/emard/ulx3s-bin.

My board came with what appeared to be a preloaded WiFi AP (source code should be this one). Goran also suggested that:
for using web interface you will need passthru sample; with ujprog you will program this file and you use -j FLASH option:
ujprog -j FLASH passthru_ulx3s_v20_12k.bit
then power off board. Power on with SD card with config file and it will connect to your network then you can use web interface to upload sram.svf files to SD card and program then from WEB interface or use buttons and OLED.

(I didn't actually do this yet)

To use the WiFi AP, a file called ulx3s-wifi.conf should be placed on a fat32 formated SD card:
{
  "host_name": "ULX3S",
  "ssid": "MyMagicSSID",
  "password": "WiFiPassWord8675309",
  "http_username": "user",
  "http_password": "pass"
}

I installed an 8GB SD card that I had used for a Raspberry Pi (I left all the RPi files) - but it did not seem to be used when I connected to the ESP32 AP. I was unable to connect with Windows 10. It seemed to see there was a "problem" in that there was no internet connectivity (duh). I had more success with my phone, connecting to the address shown on the SPI display:  http://192.168.1.4.1/  - however I was not prompted for a WiFi password, nor a username / password. I suspect somehow the SD card was not detected / not used.

The tools include a forked version of OpenOCD (oddly, no PR's accepted, no ability to open issues). Heads up that some fetches are from https://repo.or.cz/ (not sure why everything is not hosted on GitHub, this certainly makes PR's a bit less convenient - but no issue if not accepted anyhow). I built mine for some JTAG devices I had on hand, as I was not sure what "auto" meant (install if found? install everything?).
sudo apt-get install make libtool pkg-config autoconf automake texinfo libusb-1.0-0-dev
git clone https://github.com/emard/openocd.git ulx32_OpenOCD
cd ulx32_OpenOCD
./bootstrap 
./configure --prefix=/home/$USER/workspace --enable-ftdi --enable-ft232r --enable-stlink  --enable-usb-blaster --enable-jlink  --enable-buspirate
make
sudo make install
So ok, that didn't initially work for me. I ended up with this "error: libusb-1.x is required for the MPSSE mode of FTDI based devices" message:
...
checking whether to build a release... no
checking whether to build Doxygen as HTML... yes
checking whether to build Doxygen as PDF... no
checking whether to enable verbose JTAG I/O messages... no
checking whether to enable verbose USB I/O messages... no
checking whether to enable verbose USB communication messages... no
checking whether to enable malloc free space logging... no
checking whether to enable ZY1000 minidriver... no
checking whether to enable dummy minidriver... no
checking whether standard drivers can be built... yes
checking for LIBUSB1... no
configure: WARNING: libusb-1.x not found, trying legacy libusb-0.1 as a fallback; consider installing libusb-1.x insteadchecking for LIBUSB0... yes
checking for HIDAPI... no
checking for LIBFTDI... no
checking for LIBFTDI... yes
checking for LIBJAYLINK... no
configure: error: libusb-1.x is required for the MPSSE mode of FTDI based devices
The solution was to install libusb-1.0-0-dev. (added, above to apt-get install; many thanks to daveshah1 for that tip) Afterwards, all was well:

Enabled transports:
 - USB ............................ yes
 - TCP ............................ yes


OpenOCD configuration summary
--------------------------------------------------
MPSSE mode of FTDI based devices        yes
ST-Link JTAG Programmer                 yes
TI ICDI JTAG Programmer                 yes (auto)
Keil ULINK JTAG Programmer              yes (auto)
Altera USB-Blaster II Compatible        yes (auto)
Bitbang mode of FT232R based devices    yes
Versaloon-Link JTAG Programmer          yes (auto)
TI XDS110 Debug Probe                   yes (auto)
OSBDM (JTAG only) Programmer            yes (auto)
eStick/opendous JTAG Programmer         yes (auto)
Andes JTAG Programmer                   yes (auto)
USBProg JTAG Programmer                 yes (auto)
Raisonance RLink JTAG Programmer        yes (auto)
Olimex ARM-JTAG-EW Programmer           yes (auto)
CMSIS-DAP Compliant Debugger            no
Cypress KitProg Programmer              no
Altera USB-Blaster Compatible           yes
ASIX Presto Adapter                     yes (auto)
OpenJTAG Adapter                        yes (auto)
SEGGER J-Link Programmer                yes

Despite the instructions, @emard commented on gitter:
Don't use my openocd, it's obsolete (I should remove). Use latest mainstream OpenOCD, they included my patch 
That fork of OpenOCD was from github.com/ntfreak/openocd

Unfortunately, I was once again reminded that USB devices are not supported on WSL. For instance:
$ lsusb -t
/sys/bus/usb/devices: No such file or directory
Although I was able to get around this with the TinyFPGA that could use either USB or TTY drivers, OpenOCD does not. It uses only USB drivers. So I ended up downloading a pre-built binary for OpenOCD on Windows. That didn't initially work either - as the default drivers that Windows installed were the FTDI ones:


As the error appeared that OpenOCD was looking for the libusb drivers:
GNU MCU Eclipse 64-bit Open On-Chip Debugger 0.10.0+dev-00462-gdd1d90111 (2019-01-18-11:42)
Licensed under GNU GPL v2
For bug reports, read
        http://openocd.org/doc/doxygen/bugs.html
Info : only one transport option; autoselect 'jtag'
FT232R num: TCK = 5 DSR
FT232R num: TMS = 6 DCD
FT232R num: TDI = 7 RI
FT232R num: TDO = 3 CTS
FT232R num: TRST = 2 RTS
FT232R num: SRST = 4 DTR
adapter speed: 1000 kHz
Error: libusb_open() failed with LIBUSB_ERROR_NOT_SUPPORTED
Error: ft232r not found: vid=0403, pid=6015, serial=[any]
Zadig to the rescue once again, forcing a change to the drivers to libusbK:

This worked! OpenOCD found the Lattice FPGA:
GNU MCU Eclipse 64-bit Open On-Chip Debugger 0.10.0+dev-00462-gdd1d90111 (2019-01-18-11:42)
Licensed under GNU GPL v2
For bug reports, read
        http://openocd.org/doc/doxygen/bugs.html
Info : only one transport option; autoselect 'jtag'
FT232R num: TCK = 5 DSR
FT232R num: TMS = 6 DCD
FT232R num: TDI = 7 RI
FT232R num: TDO = 3 CTS
FT232R num: TRST = 2 RTS
FT232R num: SRST = 4 DTR
adapter speed: 1000 kHz
Info : clock speed 1000 kHz
Info : JTAG tap: lfe5u12.tap tap/device found: 0x21111043 (mfg: 0x021 (Lattice Semi.), part: 0x1111, ver: 0x2)
Warn : gdb services need one or more targets defined
   TapName             Enabled  IdCode     Expected   IrLen IrCap IrMask
-- ------------------- -------- ---------- ---------- ----- ----- ------
 0 lfe5u12.tap            Y     0x21111043 0x21111043     8 0x05  0xff
open("bitstream.svf"): No such file or directory
svf svf [-tap device.tap]  [quiet] [nil] [progress] [ignore_error]
xsvf (tapname|'plain') filename ['virt2'] ['quiet']
I ran OpenOCD like this, as decribed in the docs:
openocd.exe --file=ft231x.ocd --file=ecp5-XXf.cfg
with the contents of ft231x.ocd:
interface ft232r
ft232r_vid_pid 0x0403 0x6015
# ULX3S specific GPIO setting
ft232r_tck_num DSR
ft232r_tms_num DCD
ft232r_tdi_num RI
ft232r_tdo_num CTS
# trst/srst are not used but must have different values than above
ft232r_trst_num RTS
ft232r_srst_num DTR
adapter_khz 1000
and ecp5-XXf.cfg:

telnet_port 4444
gdb_port 3333

# JTAG TAPs
jtag newtap lfe5u12 tap -expected-id 0x21111043 -irlen 8 -irmask 0xFF -ircapture 0x5
#jtag newtap lfe5u25 tap -expected-id 0x41111043 -irlen 8 -irmask 0xFF -ircapture 0x5
#jtag newtap lfe5u45 tap -expected-id 0x41112043 -irlen 8 -irmask 0xFF -ircapture 0x5
#jtag newtap lfe5u85 tap -expected-id 0x41113043 -irlen 8 -irmask 0xFF -ircapture 0x5

init
scan_chain
svf -tap lfe5u12.tap -quiet -progress bitstream.svf
shutdown


 Make the ujprog (ULX2S / ULX3S JTAG programmer)
git clone https://github.com/f32c/tools.git f32c_tools
cd f32c_tools/ujprog
cp Makefile.linux Makefile
make

Usage for ujprog programmer:
ULX2S / ULX3S JTAG programmer v 3.0.92 (built Feb  8 2019 15:32:33)
Usage: ujprog [option(s)] [bitstream_file]

 Valid options:
  -p PORT       Select USB JTAG / UART PORT (default is 0)
  -P TTY        Select TTY port (valid only with -t or -a)
  -j TARGET     Select bitstream TARGET as SRAM (default) or FLASH (XP2 only)
  -f ADDR       Start writing to SPI flash at ADDR, optional with -j flash
  -s FILE       Convert bitstream to SVF FILE and exit
  -r            Reload FPGA configuration from internal Flash (XP2 only)
  -t            Enter terminal emulation mode after completing JTAG operations
  -b SPEED      Set baudrate to SPEED (300 to 3000000 bauds)
  -e FILE       Send and execute a f32c (MIPS/RISCV) binary FILE
  -x SPEED      Set binary transfer speed, optional with -e
  -a FILE       Send a raw FILE
  -d            debug (verbose)
  -D DELAY      Delay transmission of each byte by DELAY ms
  -q            Suppress messages

Make the ftx-prog programmer:
git clone https://github.com/richardeoin/ftx-prog.git
cd ftx-prog
make

Usage for ftx-prog:
ftx_prog: version 0.2
Modified for the FT-X series by Richard Meadows

Based upon:
ft232r_prog: version 1.23, by Mark Lord.

Usage:  ftx_prog [ ]..

where  must be any of:
    --help                                  # (show this help text)
    --dump                                  # (dump eeprom settings to stdout)
    --verbose                               # (show debug info and raw eeprom contents)
    --save                       <file>     # (save original eeprom contents to file)
    --restore                    <file>     # (restore initial eeprom contents from file)
    --8bit-strings                        # (byte strings)
    --cbus  [1..7]  [Tristate|RxLED|TxLED|TxRxLED|PWREN|SLEEP|Drive_0|Drive_1|GPIO|TXDEN|CLK24MHz|CLK12MHz|CLK6MHz|BCD_Charger|BCD_Charger#|I2C_TXE|I2C_RXF|VBUS_Sense|BitBang_WR|BitBang_RD|Time_Stamp|Keep_Awake]
    --manufacturer               <string>   # (new USB manufacturer string)
    --product                    <string>   # (new USB product name string)
    --old-serial-number          <string>   # (current serial number of device to be reprogrammed)
    --new-serial-number          <string>   # (new USB serial number string)
    --max-bus-power              <number>   # (max bus current in milli-amperes)
    --suspend-pull-down          [on|off]   # (force I/O pins into logic low state on suspend)
    --load-vcp                   [on|off]   # (controls if the VCP drivers are loaded)
    --remote-wakeup              [on|off]   # (allows the interface to be woken up by something other than USB)
    --ft1248-cpol                [high|low] # (set the clock polarity on the FT1248 interface to active high or active low)
    --ft1248-bord                [msb|lsb]  # (set the bit order on the FT1248 interface to msb first or lsb first)
    --ft1248-flow-control        [on|off]   # (flow control for FT1248 interface)
    --i2c-schmitt                [on|off]   # (schmitt trigger on I2C interface)
    --i2c-slave-address          <number>   # (I2C slave address)
    --i2c-device-id              <number>   # (I2C device ID)
    --rs485-echo-supp            [on|off]   # (enable echo supression on the RS485 bus)
    --old-vid                    <number>   # (current vendor id of device to be reprogrammed, eg. 0x0403)
    --old-pid                    <number>   # (current product id of device to be reprogrammed, eg. 0x6001)
    --new-vid                    <number>   # (new/custom vendor id to be programmed)
    --new-pid                    <number>   # (new/custom product id be programmed)
    --invert  [txd|rxd|rts|cts|dtr|dsr|dcd|ri]
    --self-powered               [on|off]   # (specify if chip is bus-powered or self-powered)
    --ignore-crc-error                      # Ignore CRC errors and continue
    --erase-eeprom                          # Erase the EEPROM and exit

So that's my first day with the ULXS3. Pretty cool so far. Stay tuned for more...

Resources, Inspiration, Credits, and Other Links:

Find gojimmypi at gojimmypi.github.io

I'm currently working on my new blog home at  gojimmypi.github.io After implementing a variety of features such as dark mode , syntax hi...