Having an embedded crypto chip to offload SSL processing for say, an ESP8266 sounds really quite interesting - particularly a solution that could be housed in a package as small as a tiny 3-Lead SOT-3 package! Wow, how cool would that be to help solve the problem of plain text IoT devices on devices with limited processing power and memory?
First, I'd like to thank
@MartyMacGyver for his time and assistance in helping me to better understand the Atmel crypto chips and related development boards. Be sure to see see his
CryptoAuth-explorations. As with his information, this project is neither affiliated with nor sponsored by Microchip / Atmel.
My
AT88CK590 from
Mouser Electronics arrived
last week! (erm, by the time I published this, actually a couple of months ago). Atmel has apparently not heard of "Frustration Free Packaging". Petty cardboard complaint aside, even the cheap plastic USB cap was very difficult to remove. Alas only twenty bucks, but you'd think that they'd want to make a better first impression with a developer kit, eh? Besides, you'll probably want to
pry it open anyhow. I took a soldering iron to mine and flattened the bumps that hold the USB cover in place to make it easier to remove.
I first upgraded Atmel Studio (Help - Check for Updates). That took quite some time. Next I installed the
ACES 5.0.0 Setup from the
ATT88CK50 page. You must have a device to use the software. Otherwise nothing but the "No devices" dialog box:
Once you plug in the device, the dialog box will change:
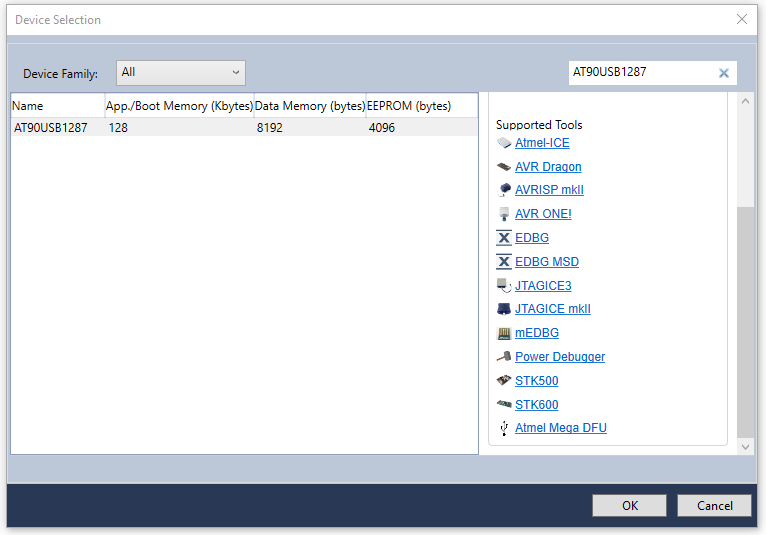
Note that the AT88CK590 USB dongle has 3 different security chips on it, each with 3 different I2C addresses. These three chips are controlled by the onboard ATmega 8-bit
Atmel AVR® AT90USB1287 microcontroller. The
complete AT90USB1287 datasheet is a whopping 456 pages long, There's also a
summary datasheet that's only 39 pages. The
schematic diagram is likely useful for review.
The important thing here: when test driving the crypto-chips directly on the USB dongle, code will target the ATUSB1287. Code will also need to be portable to your target MCU,
While reviewing the schematic, you'll see that the USB port talks *only* to the MCU, Only the MCU talks on the I2C bus to the security devices. Thus if you put different firmware on it, you could well find yourself no longer able to use the ACES software to talk to the security chips. Program with caution!
As a side note, when using Atmel Studio, here's a list of the supported programming tools for the ATUSB1287. Probably the most important one is that last DFU item.
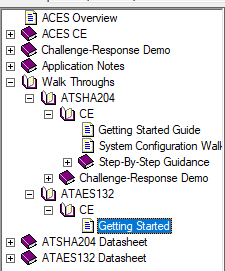
The so-called "walk-through"s in the AECS Config help were less than impressive. I swear the help looked the same as those found in Windows 3.1 - and worse: the contents also did not fully match my app. For example: there was no green indicator for system status:
Next, there was no mention of the most important point - that the Key ID number for step 2 needs to match Key ID in step #3. Obvious of course once you know this - but for first time users following a Walk-Through... hmm.
So anyhow, type a challenge phrase, press the [Execute Nonce] button, then [Execute Mac] then [Execute CheckMac]. If successful there should be a Matched status.
The ATAES132 walk-though is even less complete & less helpful.
There's only online help for 2 of the 3 chips: the ATSHA204 and and ATAES132. Of course my
ATECC508A is not listed. :| The only reason I ordered this evaluation kit was to take that chip for a test drive. After a bit of digging, I eventually discovered "
The ATECC108A and ATECC508A are supersets of the ATSHA204A and thus upward compatible". I was unable to find a full datasheet for the 508 - however once knowing that it is a superset of the
ATSHA204A, one makes the assumption that the
datasheet is (hopefully) "similar enough" to the 508.
An important piece of information in the
ATSHA204A datasheet (page 14, Section 2.1.3):
"The OTP zone of 64 bytes (512 bits) is part of the EEPROM array, and can be used for read-only storage.
Prior to locking the configuration section (using lockConfig), the OTP zone is inaccessible and can be neither read nor written. After configuration locking, but prior to locking of the OTP zone (using lockData), the entire OTP zone can be written using the Write command. If desired, the data to be written can be encrypted. When unlocked the OTP zone cannot be read."
Once you start the AECS Config tool, it appears there is no way to select a different chip to test drive. So exit and restart the app to choose a different one.
Upon restarting and selecting the 508, I was not able to get the Verify Mac to work. It appears that although the other two chips are pre-configured, this one is not. That may be expected in the stand-alone chips. I had
asked mouser if I could buy individual quantities of the ATTEC508A-SSHAW (the ones pre-configured for AWS) - but unfortunately they responded indicating that they could not break the 4000-piece reels. Still I would have expected the
ATT88CK50 to arrive pre-configured with something even if the individual 508's that I also bought were blank.
So also take note of the downloads on the Atmel site. The first two code samples after the ACES software are for the ATSHA204 chip,
not the ATECC508A.
The last download, the
Atmel-CryptoAuth-AT88CK590_Project-C-code.zip has over 3000 files. Alas that too, seems to be limited to the SHA204 and AES132 libraries. Cool if that's what you are looking for, but I was hoping to dig into the new '508s (the third and most interesting of the chips!)
So back to the Atmel/Microchip web site... <sigh> and I came across
this page on ECC-based Crypto Elements. Clicking on
"start now" takes you to yet another crypto page. Chasing the links and you'll find the
AT88CK101 Development Kit. Finally on THAT page, there's a link to the
CryptoAuthentication ATECC108A/508A Development Library 1.2.1 download. This is the
eccX08_library-150525 with a brief README and some C header and source files; not much of a walk-though here, but code is interesting.
As for the AT88CK101 - well Mouser has
6 similar but different products listed, Each are about $90 but none of which list the ATECC508A. So I'm not sure if it would be useful or not with the '508.
Continuing to chase the links, you'll see further down on the
Start Now page, that there's a link to
CryptoAuthLib. And on THAT page, there's a link to the
CryptoAuthLib Firmware Library 20160108. This is a 12MB compressed zip with many more interesting files. I'd start with the .\cryptoauthlib\docs\README.pdf then move on to .\cryptoauthlib\docs\html\index.html where there's finally some good docs! Also see there's a
doc tab, with even more downloads.
I was not able to find this code in the
Atmel github repository, nor the
MicroChip github respository. However, MicroChip does have this
github cryptoauth-openssl-engine repository that is definitely worth a look. The
README there starts out with: "
This is an OpenSSL Engine implementation using ATECC508A for ECC key storage, ECDSA sign/verify, ECDH, and FIPS Random Number Generator" and there's a cool
wiki as well.
After finding the MicroChip github, I realized that there's an entirely
different subset of documentation and downloads for the ATECC508A available, separate and different from Atmel. Apparently a cohesive and consistent web site has not been a priority after the acquisition.
I really prefer that code be available on github, rather than zip downloads. So I copied what I believe are the most relevant source files to my own
atmel-code repository. My github clones are stored in \workspace\ directory, so be sure to start with:
\workspace\atmel-code\cryptoauthlib\docs\html\index.html
After getting all this installed, I just happened to be lucky enough to be on the
github notification email alert for issue #1 and there.. a
link in the MicroChip site to this updated CryptoAuthLib gem (updated July 5, 2017). Note the CryptoAuthLib link above, specifically the
Atmel-CryptoAuthLib-Firmware_20160108.zip is noted on this new page as "
Not recommended for New Designs" - note there's also no indication of this new firmware on the
Atmel CryptoAuthLib page!
If you download that updated zip file - in the README.md there's a note to watch the
CryptoAuthLib documents (on the Atmel site) for "new examples coming online". (as of the timw of my writing this, there's noting newer than January of 2016). I wonder why MicroChip would post new code on the Atmel site, referenced from a download from the MicroChip site?
Revisiting the mod topic, the
Atmel Flip 3.4.7 as mentioned
here does not seem to work on Windows 10. Both the "requires Java Runtime and "Jave Runtime Included" return an error message:
The
newer (January 2017) flip program on the MicroChip site is actually an older version 2.4.6 from 2002 that only supports a limited number of chips such as the 89c51 series.
Fortunately I happened to already have a Windows 7 machine setup in a VMWare Workstation, Upon running the same setup there, I was able to get the Flip utility working. However not much more than that - as after selecting an MCU, I received this error complaining about a missing libusb0.dll
The issue here, is that apparently the Atmel drivers needs to be manually installed/updated. Once again, thanks @MartyMacGyver for the
tips on replacing the AT90USB1287 drivers on Windows 7. Here, just go to Control Panel - Device Manager. Right-click on the Atmel Device and select "Update Driver Software...".
Then manually select the Atmel Flip directory:
(as usual, you may be prompted to reboot)
Curiously, not only do I have the Java Virtual Machine problem on Windows 10, but I also don't see the Atmel device listed anywhere in device manager. Windows 10 *does* see it, as I am able to go into VMWare workstation and connect the host device to the Windows 7 VM. Hmm.. I'm not sure I want to fire up a Windows 7 VM every time.
So at this point, I am really quite underwhelmed, unimpressed, and rather disappointed and frustrated. I am also however - rather relentless. A bit of googling and of course I immediately found others with the
same problem on the
avrfreaks site. Fortunately the
AT90USB1287 is DFU Bootloader Capable, and my old friend
avrdude is a DFU loader! There are a variety of avrdude tutorials out there, including
this one from lady ada. If you have the Arduino library installed on Windows, you likely have avrdude installed here: C:\Program Files (x86)\Arduino\hardware\tools\avr\bin (and it likely will not be in your path).
The first thing we'll want to do is read and save the firmware!
"C:\Program Files (x86)\Arduino\hardware\tools\avr\bin\avrdude.exe"
"C:\Download\Atmel\Atmel-CryptoAuth-AT88CK590_Project-C-code_1-0-5\DevelopmentKits\AT88CK590\CombinedLibraries\AtmelStudio6\CombinedLibraries\OutputConfigDefault\"
gives an error:
avrdude.exe: can't open config file "": Invalid argument
avrdude.exe: error reading system wide configuration file ""
so I tried on linux (Ubuntu)
avrdude -pusb1287 -cflip1 -Uflash:r:read-usb1287:a
different error:
avrdude: Error: No matching USB device found
avrdude: AVR device initialized and ready to accept instructions

Reading |                                                    | 0% 0.00savrdude: error reading signature data for part "AT90USB1287", rc=-1
avrdude: error reading signature data, rc=-1

avrdude done.  Thank you.
it appears that when plugged in, there are 2 new /dev/ items:
/dev/hidraw1
/dev/usb
I tried to change permissions, no luck there.
sudo chmod 777 /dev/usb
sudo chmod 777 /dev/hidraw1
Same avrdude error. A bit more googling and I found
this note that you need to first boot the usb1287 into DFU mode. As yes, just as
@MartyMacGyver described in his wiki on
entering DFU mode. After chasing documentation and other software issues, I had almost forgotten about his great walk-through that includes valuable DFU info.
I simply want to have an embedded solution for SSL. They certainly don't make it easy. Just out of curiosity, I thought I'd poke around and see what sort of alternative solution might be available. One of the tools appears to be the
AT88CK9000 Secure Personalization Kit. Alas, that too turned out to be a comedy of "not available":
I at least
found them at Mouser. There are 2 options:
$374 for the 3 lead SOT23 package, oh - but $
499 for the 8 pic SOIC package, currently "on order".
Ok, so back to getting the device into DFU mode. Looks like I will need to jump in with both feet with no return.
again with avrdude, this time in DFU (you'll know DFU mode by seeing only the red LED illuminated; all the blue crypto LED's will be dark.
avrdude -pusb1287 -cflip1 -Uflash:r:read-usb1287:a
results instead with:
avrdude: AVR device initialized and ready to accept instructions

Reading | ################################################## | 100% 0.02s

avrdude: Device signature = 0x1e9782 (probably usb1287)
avrdude: Error: "lfuse" memory not accessible using FLIP
avrdude: Error: "lfuse" memory not accessible using FLIP
avrdude: reading flash memory:

Reading |                                                    | 0% 0.00savrdude: Error: DFU_UPLOAD failed: error sending control message: Broken pipe

avrdude:
         ***********************************************************************
         Maybe the device is in ``security mode´´, and needs a chip erase first?
         ***********************************************************************

avrdude: Error: DFU_UPLOAD failed: error sending control message: Broken pipe
avr_read(): error reading address 0x0000
    read operation not supported for memory "flash"
avrdude: failed to read all of flash memory, rc=-2

avrdude: Error: "lfuse" memory not accessible using FLIP
avrdude: Error: "lfuse" memory not accessible using FLIP
avrdude: Error: "lfuse" memory not accessible using FLIP
avrdude: Error: "lfuse" memory not accessible using FLIP
avrdude: safemode: Sorry, reading back fuses was unreliable. I have given up and exited programming mode

avrdude done.  Thank you.
Clearly a part 2 is due here... see this
next part on setting up AWS as a secure MQTT server
Resources and other info: