Showing posts with label WiFi. Show all posts

Sunday, November 1, 2020

EA3500 OpenWRT WiFi to WiFi STA Routing

Setting up Cisco Linksys EA3500 as WiFi to WiFi (STA mode) to have wired ethernet clients instead of WiFi clients (as opposed to the typical AP mode). 

TL;DR; install OpenWRT; change Network - Interfaces IP address of EA3500; use wireless mode N, auto.

I want to connect my wired ethernet device, for example the Envox EEZ Bench Box 3 "Modular, open-source test & measurement chassis" to WiFi. Sounds simple enough...

Update: the above picture is not accurate unless router forwarding rules are manually applied.

In my prior blogs, I recorded some notes on setting up a Raspberry Pi as either a WiFi STA Router (not an AP!) to route local eth0 onto the wlan0 for WiFi-to-WiFi connection (most people do the reverse: hardwire a WiFi router to their ISP and use it as an access point routing wlan0 to eth0). The routed solution has the benefit of an arbitrary number of ethernet clients, but the disadvantage of being on a different network and requiring some manual routing configuration. An alternative solution used the clever wlan_kable app to instead bridge the local RPi eth0 onto the WiFi network. This is works much more gracefully with no manual routing config, but was limited to a single device. This was ok, as I only wanted by BenchBox3 to have WiFi network capability. However, I later experienced some oddities when downloading large automation scripts to the BB3. On to the next option: a "real" router.

I have an old Linksys EA3500 available. They can be found on ebay for around 10 bucks (cheaper than a Raspberry Pi!) Of course, the native firmware does not support using the WiFi radio as a client station. The first thing that comes to mind is WRT: either dd-wrt or OpenWRT. It seems that the dd-wrt solution will pretty much never happen, despite having support for a large number of routers. If it turns out you have one of those routers and want to use dd-wrt, be sure to read the Client Mode wiki.

The very first google search for OpenWRT EA3500 however, was a link to the OpenWRT firmware download page for the EA3500! Could it be that easy? Yes! I simply loaded the 19.07.04 Firmware OpenWRT Install and voila! OpenWRT on the EA3500!! 

This is not the first time I've used OpenWRT. See my prior blog on OpenWRT on EA3500 with RTL-SDR Stream.

If you don't know the password on the router, hold down the reset button for 30 seconds to factory reset (until the LED next to the power starts to blink). The default password is: admin

Upgrading from stock firmware is found under "Connectivity" (go figure).


Click on the "Choose file..." and select the OpenWRT file, and click "Start".


Note that if you are concerned about bricking your router, there are fallback options, and in particular I think the Tigard multi-protocol, multi-voltage tool for hardware hacking could be helpful for not only unbricking, but lots of other cool hardware hacking adventures.

For reference: OpenWRT also has an excellent EA3500 feature summary, copied here as we know things on the internet sometimes just vanish:

There's a wiki guide for OpenWRT: Connect to client Wi-Fi network. Alas I followed along multiple times and simply could not get my WiFi router to connect. Lesson #1: It won't tell you if you enter the wrong WiFi password for the AP you are trying to connect to as a STA client. It just won't work. (and will appear and disappear from the Network - Wireless "Associated Stations") Beyond that, the instructions were not completely clear for this router with various firewall settings, etc. Thus my notes are here:

As described at the beginning on the WRT wiki, if your local network is 192.168.1.x then the router interface needs to be changed to a different network, say 192.168.2.x; See Network - Interfaces:


Actually, I almost never leave a network default at 192.168.1.x as there will typically be a conflict such as this. Alas for this demo I was on a test network...

In my case, my PC was connected to the target wireless AP (referred to here as "your_SSID") and the EA3500 was plugged into my ethernet port. I disabled the WiFi on my PC that was on the same network (192.168.1.0) to configure the EA3500. After editing the IPv4 device address to some other network (e.g. 192.168.2.1), notice the defined network also changes. 


The wireless settings tab is also someplace that I was tripped up; Next, under Network - Wireless, click the scan button for Generic MAC80211 802.11bgn. (not the one ending in "an") Find your SSID and click the "Join Network" button and enter your SSID and pass phrase:. 


When saving, there will be a bit more config: leave mode set to "N" and change channel to "Auto".


Although previously pressing "save", it is not until you press the "Save & Apply" button:


That's it! Despite the wiki mentioning firewall settings, etc. It is not needed for basic functionality (you may still with to optimize and further secure the router). It is best to restart the BB3 and exit EEZ Studio as well before connecting with the new router.

Some other details:

Note the OpenWRT has SSH enabled by default:


See the luci essentials. Of particular interest are the /etc/config/uhttpd and /etc/config/luci configuration files for luci. See the other files in \etc\config for other config files:

Note that only 4 files are changed from the default install to get basic operational functionality:

/etc/config/dhcp
root@OpenWrt:~# cat /etc/config/dhcp

config dnsmasq
        option domainneeded '1'
        option boguspriv '1'
        option filterwin2k '0'
        option localise_queries '1'
        option rebind_protection '1'
        option rebind_localhost '1'
        option local '/lan/'
        option domain 'lan'
        option expandhosts '1'
        option nonegcache '0'
        option authoritative '1'
        option readethers '1'
        option leasefile '/tmp/dhcp.leases'
        option resolvfile '/tmp/resolv.conf.auto'
        option nonwildcard '1'
        option localservice '1'

config dhcp 'lan'
        option interface 'lan'
        option start '100'
        option limit '150'
        option leasetime '12h'
        option dhcpv6 'server'
        option ra 'server'
        option ra_management '1'

config dhcp 'wan'
        option interface 'wan'
        option ignore '1'

config odhcpd 'odhcpd'
        option maindhcp '0'
        option leasefile '/tmp/hosts/odhcpd'
        option leasetrigger '/usr/sbin/odhcpd-update'
        option loglevel '4'

/etc/config/firewall

root@OpenWrt:~# cat /etc/config/firewall

config defaults
        option syn_flood '1'
        option input 'ACCEPT'
        option output 'ACCEPT'
        option forward 'REJECT'

config zone
        option name 'lan'
        option input 'ACCEPT'
        option output 'ACCEPT'
        option forward 'ACCEPT'
        option network 'lan'

config zone
        option name 'wan'
        option input 'REJECT'
        option output 'ACCEPT'
        option forward 'REJECT'
        option masq '1'
        option mtu_fix '1'
        option network 'wan wan6 wwan'

config forwarding
        option src 'lan'
        option dest 'wan'

config rule
        option name 'Allow-DHCP-Renew'
        option src 'wan'
        option proto 'udp'
        option dest_port '68'
        option target 'ACCEPT'
        option family 'ipv4'

config rule
        option name 'Allow-Ping'
        option src 'wan'
        option proto 'icmp'
        option icmp_type 'echo-request'
        option family 'ipv4'
        option target 'ACCEPT'

config rule
        option name 'Allow-IGMP'
        option src 'wan'
        option proto 'igmp'
        option family 'ipv4'
        option target 'ACCEPT'

config rule
        option name 'Allow-DHCPv6'
        option src 'wan'
        option proto 'udp'
        option src_ip 'fc00::/6'
        option dest_ip 'fc00::/6'
        option dest_port '546'
        option family 'ipv6'
        option target 'ACCEPT'

config rule
        option name 'Allow-MLD'
        option src 'wan'
        option proto 'icmp'
        option src_ip 'fe80::/10'
        list icmp_type '130/0'
        list icmp_type '131/0'
        list icmp_type '132/0'
        list icmp_type '143/0'
        option family 'ipv6'
        option target 'ACCEPT'

config rule
        option name 'Allow-ICMPv6-Input'
        option src 'wan'
        option proto 'icmp'
        list icmp_type 'echo-request'
        list icmp_type 'echo-reply'
        list icmp_type 'destination-unreachable'
        list icmp_type 'packet-too-big'
        list icmp_type 'time-exceeded'
        list icmp_type 'bad-header'
        list icmp_type 'unknown-header-type'
        list icmp_type 'router-solicitation'
        list icmp_type 'neighbour-solicitation'
        list icmp_type 'router-advertisement'
        list icmp_type 'neighbour-advertisement'
        option limit '1000/sec'
        option family 'ipv6'
        option target 'ACCEPT'

config rule
        option name 'Allow-ICMPv6-Forward'
        option src 'wan'
        option dest '*'
        option proto 'icmp'
        list icmp_type 'echo-request'
        list icmp_type 'echo-reply'
        list icmp_type 'destination-unreachable'
        list icmp_type 'packet-too-big'
        list icmp_type 'time-exceeded'
        list icmp_type 'bad-header'
        list icmp_type 'unknown-header-type'
        option limit '1000/sec'
        option family 'ipv6'
        option target 'ACCEPT'

config rule
        option name 'Allow-IPSec-ESP'
        option src 'wan'
        option dest 'lan'
        option proto 'esp'
        option target 'ACCEPT'

config rule
        option name 'Allow-ISAKMP'
        option src 'wan'
        option dest 'lan'
        option dest_port '500'
        option proto 'udp'
        option target 'ACCEPT'

config include
        option path '/etc/firewall.user'


(my /etc/firewall.user had nothing extra)

/etc/config/network

root@OpenWrt:~# cat /etc/firewall.user
# This file is interpreted as shell script.
# Put your custom iptables rules here, they will
# be executed with each firewall (re-)start.

# Internal uci firewall chains are flushed and recreated on reload, so
# put custom rules into the root chains e.g. INPUT or FORWARD or into the
# special user chains, e.g. input_wan_rule or postrouting_lan_rule.
root@OpenWrt:~# cat /etc/config/network

config interface 'loopback'
        option ifname 'lo'
        option proto 'static'
        option ipaddr '127.0.0.1'
        option netmask '255.0.0.0'

config globals 'globals'
        option ula_prefix 'fdb2:e9f2:64b4::/48'

config interface 'lan'
        option type 'bridge'
        option ifname 'eth0.1'
        option proto 'static'
        option netmask '255.255.255.0'
        option ip6assign '60'
        option ipaddr '192.168.2.1'

config interface 'wan'
        option ifname 'eth1.2'
        option proto 'dhcp'

config interface 'wan6'
        option ifname 'eth1.2'
        option proto 'dhcpv6'

config switch
        option name 'switch0'
        option reset '1'
        option enable_vlan '1'

config switch_vlan
        option device 'switch0'
        option vlan '1'
        option ports '0 1 2 3 5t'

config switch_vlan
        option device 'switch0'
        option vlan '2'
        option ports '4 6t'

config interface 'wwan'
        option proto 'dhcp'


/etc/config/wireless

root@OpenWrt:~# cat /etc/config/wireless

config wifi-device 'radio0'
        option type 'mac80211'
        option hwmode '11g'
        option path 'mbus@f1000000/mbus@f1000000:pcie@82000000/pci0000:00/0000:00:01.0/0000:01:00.0'
        option htmode 'HT20'
        option channel 'auto'

config wifi-iface 'default_radio0'
        option device 'radio0'
        option network 'lan'
        option mode 'ap'
        option ssid 'OpenWrt'
        option encryption 'none'
        option disabled '1'

config wifi-device 'radio1'
        option type 'mac80211'
        option channel '36'
        option hwmode '11a'
        option path 'mbus@f1000000/mbus@f1000000:pcie@82000000/pci0000:00/0000:00:02.0/0000:02:00.0'
        option htmode 'HT20'
        option disabled '1'

config wifi-iface 'default_radio1'
        option device 'radio1'
        option network 'lan'
        option mode 'ap'
        option ssid 'OpenWrt'
        option encryption 'none'

config wifi-iface 'wifinet2'
        option ssid 'your_SSID'
        option device 'radio0'
        option mode 'sta'
        option key 'your_SSID_password_in_plain_text'
        option network 'wwan'
        option encryption 'psk2'


Of course, see that line: option mode 'sta' near the bottom of wireless settings: The key to all of this!


Sunday, October 25, 2020

Raspberry Pi Network eth0 to wlan0 Router

Connecting ethernet wired-only equipment to WiFi.

TL;DR install dnsmasq, edit /etc/dnsmasq.conf to setup DHCP server and /etc/dhcpcd.conf to configure eth0, enable forwarding then manually set default routes.

There are lots of articles on using a Raspberry Pi as a WiFi AP (Access Point, aka "hotspot") and routing that traffic onto a wired eth0 connection: wlan0 to eth0. I want the opposite: take a Raspberry Pi STA (Station aka "client", already connected to some other WiFi) and route the local eth0 traffic into the wireless wlan0. Ideally, I'd like that eth0 to be bridged onto the WiFi network (DHCP relay onto eth0). Turns out that's not so easy. Google "can't add wlan0 to bridge br0: Operation not supported"

Why do this? Well, I started with my new Envox BB3 programmable power supply that has only a wired ethernet connection. What would it take to connect it via a Raspberry Pi to WiFi? Not as trivial of a matter as I had expected. 


To get started, see my prior blog on setting up a headless Raspberry Pi

This first operational example below uses somewhat of a brute-force method in using dhcpcd to manually configure the eth0 interface, and dnsmasq as a DHCP server. 

First, install dnsmasq
sudo apt-get install dnsmasq --assume-yes                               

Essential to the RPi acting as a forwarding router, edit the /proc/sys/net/ipv4/ip_forward file and ensure a value of 1 is there. Note that the change is immediate, although perhaps not permanent. Thanks to a comment on stackexchange, I found this to be very helpful:
grep -rn net.ipv4.ip_forward /etc/*                                  

In my case: /etc/sysctl.conf:28:#net.ipv4.ip_forward=1

Note the line is commented out. To make IP forwarding permanent, edit the /etc/sysctl.conf file to uncomment the net.ipv4.ip_forward=1 line.

Edit /etc/dnsmasq.conf and add these lines at the end to serve as a DHCP server on the RPi ethernet port:
#configure the eth0 interface
interface=eth0

# The three modes are "wildcard", "bind-interfaces" and "bind-dynamic".
bind-dynamic

# Never forward plain names (without a dot or domain part)
domain-needed

# Never forward addresses in the non-routed address spaces.
bogus-priv

# Set the NTP time server address to be the same machine as is running dnsmasq
dhcp-option=42,0.0.0.0

# enable the integrated DHCP server, you need to supply the range of 
# addresses available for lease and optionally a lease time
dhcp-range=192.168.42.50,192.168.42.59,255.255.255.0,12h

Edit /etc/dhcpcd.conf (see RPi docs and man page) and add these lines to assigned a fixed IP address to the RPi ethernet port:
interface eth0
static ip_address=192.168.42.10/24

# add the default route on the RPi on the line below. See command: 
# ip route | grep default
# static routers=192.168.42.10
static routers=192.168.42.10, 192.168.1.10

# Don't solicit or accept IPv6 Router Advertisements and DHCPv6
noipv6

# Don't solicit or accept IPv6 Router Advertisements.
noipv6rs

# ensure this route has a high metric to not use it for regular traffic
metric 900

Reboot the RPi.

Once everything is setup, a tiny bit of attention is needed to get routing working properly. This is because your default router does not "know" that a new network exists and is routed through a specific device interface. We need to know the IP address of the RPi that is now acting as router, shown here using the ifconfigcommand:

pi@raspberrypi:~$ ifconfig -a wlan0
wlan0: flags=4163<UP,BROADCAST,RUNNING,MULTICAST>  mtu 1500
        inet 192.168.1.110  netmask 255.255.255.0  broadcast 192.168.1.255
My IP address in this case is 192.168.1.110, other WiFi IP addresses will likely be different.

The best way to set the new default route is at the WiFi router itself. Given the many different types of routers, there are as many methods of setting a new route. For dd-wrt, see static routing.

Alternatively, this can be done on a local workstation (in my case the one running EEZ Studio that I want to connect to the BB3); On Windows in an administrative privileges DOS command prompt. connected to the same network WiFi as the RPi configured above, we need to manually tell Windows how to find the new Raspberry Pi routed subnet with the DOS route command:

ROUTE [-f] [-p] [-4|-6] command [destination] [MASK netmask] [gateway] [METRIC metric] [IF interface]

In our case: route add [destination network] mask 255.255.255.0 [RPi address]:

route add 192.168.42.0 mask 255.255.255.0 192.168.1.110
  
This basically tells windows: hey, to find the 192.168.42.0 network, route via the address of our Raspberry Pi at 192.168.1.110

To confirm operation:
pi@raspberrypi:~$ ifconfig
eth0: flags=4163<UP,BROADCAST,RUNNING,MULTICAST>  mtu 1500
        inet 192.168.42.10  netmask 255.255.255.0  broadcast 192.168.42.255

lo: flags=73<UP,LOOPBACK,RUNNING>  mtu 65536
        inet 127.0.0.1  netmask 255.0.0.0

wlan0: flags=4163<UP,BROADCAST,RUNNING,MULTICAST>  mtu 1500
        inet 192.168.1.110  netmask 255.255.255.0  broadcast 192.168.1.255

pi@raspberrypi:~$ route
Kernel IP routing table
Destination     Gateway         Genmask         Flags Metric Ref    Use Iface
default         192.168.1.10    0.0.0.0         UG    303    0        0 wlan0
192.168.1.0     0.0.0.0         255.255.255.0   U     303    0        0 wlan0
192.168.42.0    0.0.0.0         255.255.255.0   U     900    0        0 eth0
And on Windows with the route print command (edited here, as I have VM's cluttering up the list):
C:\>route print
  
IPv4 Route Table
===========================================================================
Active Routes:
Network Destination        Netmask          Gateway       Interface  Metric
          0.0.0.0          0.0.0.0     192.168.1.10    192.168.1.140     50
      192.168.1.0    255.255.255.0         On-link     192.168.1.140    306
    192.168.1.140  255.255.255.255         On-link     192.168.1.140    306
    192.168.1.255  255.255.255.255         On-link     192.168.1.140    306
     192.168.42.0    255.255.255.0    192.168.1.110    192.168.1.140     51
  255.255.255.255  255.255.255.255         On-link     192.168.1.140    306
===========================================================================
Persistent Routes:
  None
 
If you see an error "Timeout (no response to IDN query)" in EEZ Studio, try rebooting the BB3


In the end, although this technically works - it is still not the simple solution I am looking forward. It is too annoying to find DHCP address (or manually configure a static one), and the fuss with manual routes. In my next blog, I test drive wan_kabel. It is pretty cool!


Resources, Inspiration, Credits, and Other Links:


Friday, April 28, 2017

OpenDPS with the DPS5015


Once again, I found an awesome project via twitter, this time from Johan Kanflo via this article from hackaday folks:

http://hackaday.com/2017/03/07/open-source-firmware-for-a-cheap-programmable-power-supply/

Or more directly, Johan's blog here:

https://johan.kanflo.com/hacking-the-dps5005/

After reading the details, I promptly ordered my own device, specifically this RD DPS5015 Buck Power Supply LCD color display step-down voltage converter on eBay. This DPS is similar, but different than the one Johan used, going on the assumption that it is similar: "Although this guide is written for the ‘5005 it should work for the entire DPS family but I only have 5005s to test with."

Upon inspection, I found that the onboard processor is an 32F100C8T6B with the LQFP48 pinout using the same pin configuration as on the DPS5005 in Johan's project:


http://www.st.com/content/st_com/en/products/microcontrollers/stm32-32-bit-arm-cortex-mcus/stm32f1-series/stm32f100-value-line/stm32f100c8.html

"Medium-density devices are STM32F100x8 and STM32F100xB microcontrollers where the Flash memory density ranges between 64 and 128 Kbytes." [*1]

The [x] is a placeholder for only 1 character, not "all characters until the end, excluding the last B". The "B" in STM32F100CB means "128KB". This is not to be confused with STM32F100C8 or in the case of the DPS5015 - the STM32F100C8T6B - which are 64KB devices.

Don't confuse the 8 or B  with the trailing "B" on the end, That last B is an "Internal Code" having nothing to do with flash size.


I had OpenOCD for Windows installed via the sysprog VisualGDB app, so I used  that one:

cd C:\SysGCC\esp8266\esp8266-bsp\OpenOCD\share\openocd\scripts
openocd -f interface/stlink-v2.cfg -f target/stm32f1x.cfg

Compiling on Windows turned out to be a real pain, giving lame errors like this:

GENHDR include/libopencm3/stm32/l1/irq.json
GENHDR include/libopencm3/stm32/l4/irq.json
GENHDR include/libopencm3/vf6xx/irq.json
BUILD lib/stm32/f0
make[1]:  No rule to make target desig.o', needed byC:/workspace/libopencm3/lib/libopencm3_stm32f0.a'. Stop.
make:  [lib/stm32/f0] Error 2

https://github.com/libopencm3/libopencm3

@ChuckM over on the libopencm3 gitter:

https://gitter.im/libopencm3/

...suggested that I install the WSL

https://msdn.microsoft.com/en-us/commandline/wsl/install_guide

and so ok, once I have Ubuntu on Windows (am I the only one to find that crazy?!?! *Ubuntu* on *Windows* - wow!)... all the toolchain items need to be installed fresh. None of the Windows binaries will run. So I installed the items listed here:

https://developer.arm.com/open-source/gnu-toolchain/gnu-rm

specifically:

sudo apt-get update
sudo apt-get install binutils
sudo apt-get install gcc
sudo apt-get install gdb
sudo apt-get install make
sudo apt-get install build-essential

sudo apt-get install python
sudo apt-get install gawk

sudo apt-get install openocd


then download the GNU ARM Embedded Toolchain from:

https://developer.arm.com/open-source/gnu-toolchain/gnu-rm/downloads

sudo tar -xvjf gcc-arm-none-eabi-6-2017-q1-update-linux.tar.bz2

(I put mine in c:\Downloads\arm\  aka  /mnt/c/download/arm in Ubuntu window)

All this ended up needing a path like this:

export PATH="/usr/bin/Python27:/mnt/c/download/arm/gcc-arm-none-eabi-6-2017-q1-update/bin:/usr/local/bin:/usr/bin:/bin"

I ended up hosting the OpenOCD from MINGW64 bash prompt, but programming via the Ubuntu bash prompt (this is NOT a good idea). The problem is with the apparent path. When doing a "make flash" - I kept getting a "couldn't open opendps.elf" error (yet the file was there).

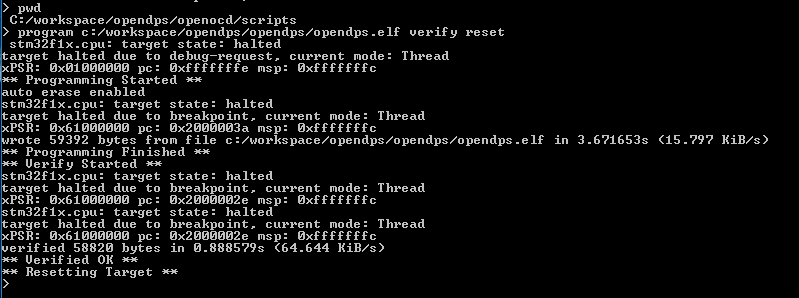
Doing a "pwd" from the OpenOCD telnet session revealed all!

 C:/workspace/opendps/openocd/scripts

This is despite the fact that MINGW64 sees the path as:

/c/workspace/opendps/openocd/scripts

and the Ubuntu Bash sees it as:

/mnt/c/workspace/ ...

the libopencm3.rules.mk file had this simple command for "make flash":

program $(*).elf verify reset exit
so I used a manual command in the OpenOCD telnet session:

program c:/workspace/opendps/opendps/opendps.elf verify reset

and voila! a newly programmed  DPS5015!


Other stuff:

I found a couple of nice cases on Aliexpress: this console-style and this this shelf unit style.

There's also this interesting hack that uses an Arduino to control the unit by emulating the button presses: http://www.instructables.com/id/Power-Supply-Automation-DPS5015-DP50V5A-Controlled/

The Hangzhou Ruideng Technologies Co., Ltd store can be found here:

https://rdtech.aliexpress.com/store/923042

There's also this video:


Next step: follow Johan's instructions for using ESP8266 for WiFicontrol....


*1 - page 6 of PM0063 Programming manual STM32F100xx value line Flash programming

Find gojimmypi at gojimmypi.github.io

I'm currently working on my new blog home at  gojimmypi.github.io After implementing a variety of features such as dark mode , syntax hi...