
This should have been a trivial project. The STM32 board has an 8 pin female header. The display board has an 8 pin male header. As with most things, getting it to actually function was way more difficult than it needed to be. Upon inspection, the pins are not a match. Fortunately the Vcc and GND are - so at least it is unlikely the board would be fried when plugging in, but it certainly won't work. More specifically, here are the pins:

To make matters worse, even the sample code I planned to use was using yet another set of pin definitions (Port B, pins 3 to 7 including soft reset):

So ok, first whip together a bunch of jumper wires to make sure everything actually works.

The octopus of jumper wires is really not very appealing. So I spent some time making a little adapter. (for the time it took, I'm glad I am not planning a production run!)
Here's the interface modifications needed:

And here's what my newly created adapter looks like:

This allows a somewhat more graceful connection, sans poulpe:
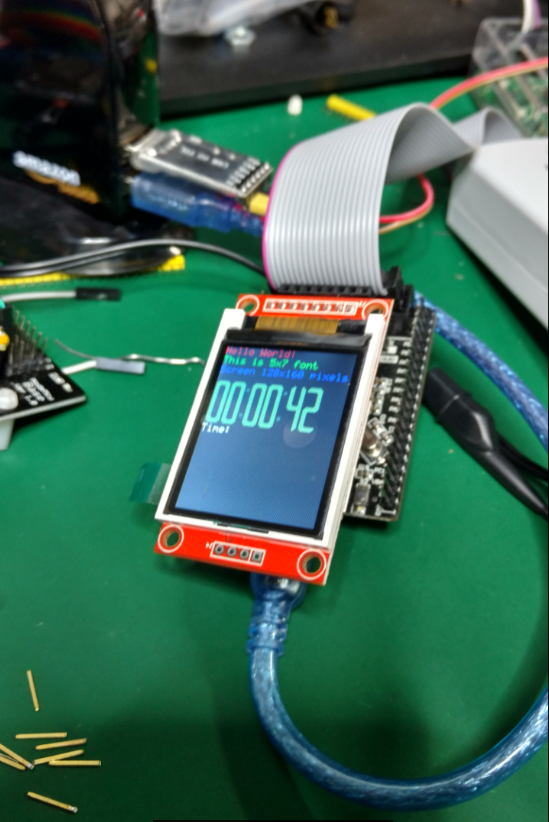
One the software side, things were just as annoying - but of course way easier to fix. (no dremel tool to cut proto-board, no wiring, no soldering!)
I found this really excellent STM32 ST7735 library on github:
The code was of course not plug & play... but it was very close. In addition to the pin definition inconsistencies - I also had the problem of IDE. Apparently the code on github was created with something that knows how to deal with a "coproj" project file (I have no idea what IDE is needed).
So I cracked open my old time friend Visual Studio with the VisualGDB add-in. I first created a project with the STM32 HAL, then quickly realized the sample code was not implemented with HAL... so I tried again, creating another project this time with the STM32F1 Legacy Peripheral Library.
Type STM32F103C8 in the filter to find the MCU chip used in the board.

Then pick the "LEDBlink (StdPeriph)" sample project to generate:
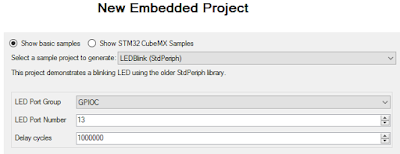
Note the LED setting for the STM32 Smart V2 is on Port C Pin 13.
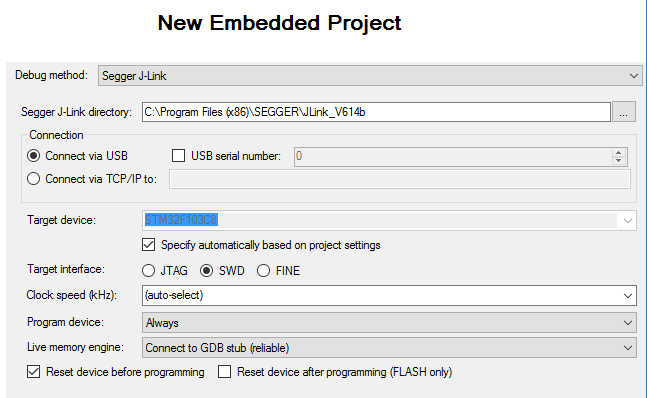
On the last page, pick your debugger. I'm using a Segger J-Link:
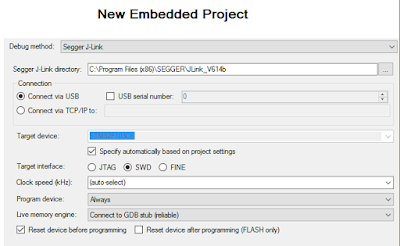
(I have some other Segger USB tips here)
In order to add ST7735 LED Display support, only the main project directory files need to be copied from the github sample (VisualGDB has its own support files in the path). In this case: main, delay, font5x7, garmin-digits, and of course STM7735 files:

The crmsis and stm_lib directories can be ignored.
Note that since the project created the LEDBlink.cpp file, that file will need to be deleted, as it also has a "void main()". Consider copying the LED blink code if interested.
Type STM32F103C8 in the filter to find the MCU chip used in the board.

Then pick the "LEDBlink (StdPeriph)" sample project to generate:

Note the LED setting for the STM32 Smart V2 is on Port C Pin 13.
On the last page, pick your debugger. I'm using a Segger J-Link:
(I have some other Segger USB tips here)
In order to add ST7735 LED Display support, only the main project directory files need to be copied from the github sample (VisualGDB has its own support files in the path). In this case: main, delay, font5x7, garmin-digits, and of course STM7735 files:
The crmsis and stm_lib directories can be ignored.
Note that since the project created the LEDBlink.cpp file, that file will need to be deleted, as it also has a "void main()". Consider copying the LED blink code if interested.
There were a variety of "issues" that needed to be addressed. For one, although the files ending in ".c" were included in the project, for some reason Visual Studio could not seem to "find" the code, giving me a ton of "undefined reference" errors. There are a bunch of other files that end in ".c" so I really don't know why the problem... but in renaming them to ".cpp" seems to have appeased the compiler. (there's likely a setting someplace that distinguishes a "C" app from a "C++" one.
Things went a bit rough at first. Even once I was able to get the app to compile, I ended up stuck in some interesting code:

I had a difficult time with the suggested DEBUG_DEFAULT_INTERRUPT_HANDLERS. Fortunately the kind support folks at sysprogs forum had some helpful advice:
And sure enough, when turning on the DEBUG_DEFAULT_INTERRUPT_HANDLERS feature in Visual Studio Project Properties: C/C++ Preprocessor Definitions:

The problem was immediately obvious. The SysTick_Handler was not properly configured (despite being right there in delay.c; renamed to delay.cpp). The problem here seems to be the difference between the original C code, and this C++ project. It needed to be prefixed with extern "C":

(a compile-time warning might have been nice here)
Once everything compiles successfully, a few more changes are needed to point the controlling pins at the ones actually used on the STM32 Smart V2 board. This is all defined in the SM7735.h file:
This board uses GPIO Pins 13 and 15 (SPI Port 2), so set this in the config file:
#define _SPI_PORT 2

Additionally, the A0 and CS pins need to be set. From the pin diagram, A0 is Port B pin 1, and CD is Port B pin 12.
#define ST7735_A0_PIN GPIO_Pin_1
#define ST7735_RST_PORT GPIOB
#define ST7735_RST_PIN GPIO_Pin_6
#define ST7735_CS_PORT GPIOB
#define ST7735_CS_PIN GPIO_Pin_12

Reset is hard wired to actual reset (NRST) line, so the "soft" reset functions will not work (e.g. RST_L and RST_H). In code, it is left assigned here to Port B Pin 6. The manual reset of the display occurs in void ST7735_Init(void). If you really want the soft reset, perhaps consider not connecting the NRST pin and instead wiring something up to the unused Pin 8 on the STM32 Smart board.
I've posted my source code here: https://github.com/gojimmypi/STM32-ST7735
If you are interested in the ST7735 display for the STM32, you may also be interested in some of the many other STM32 libraries created by LonelyWolf:
https://github.com/LonelyWolf/stm32


No comments:
Post a Comment
comments are disabled as nobody seemed to understand the no spam request.
See my latest blog at gojimmypi.github.io
Note: Only a member of this blog may post a comment.