Saturday, February 9, 2019

ULX3S - Day 1

I first learned about the ULX3S via the Hackaday Article last month. (see also hackster.io) There was an offer for boards at the bottom of the radiona.org ulx3s page, so I promptly contacted them. There was only one 12F board left (I confirmed mine is the latest v3.0.3 version), and without the ESP32 connected. Goran was so kind: he not only soldered on the ESP32, but he also included a sticker, headers, the SPI display, and even an awesome 3D-Printed case! (for those that follow me - you know my ongoing quest to find good enclosures for projects)

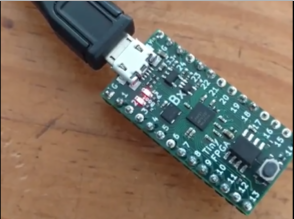
My board arrived all the way from Croatia, and just in time for the weekend! Power-on success is always a good start:


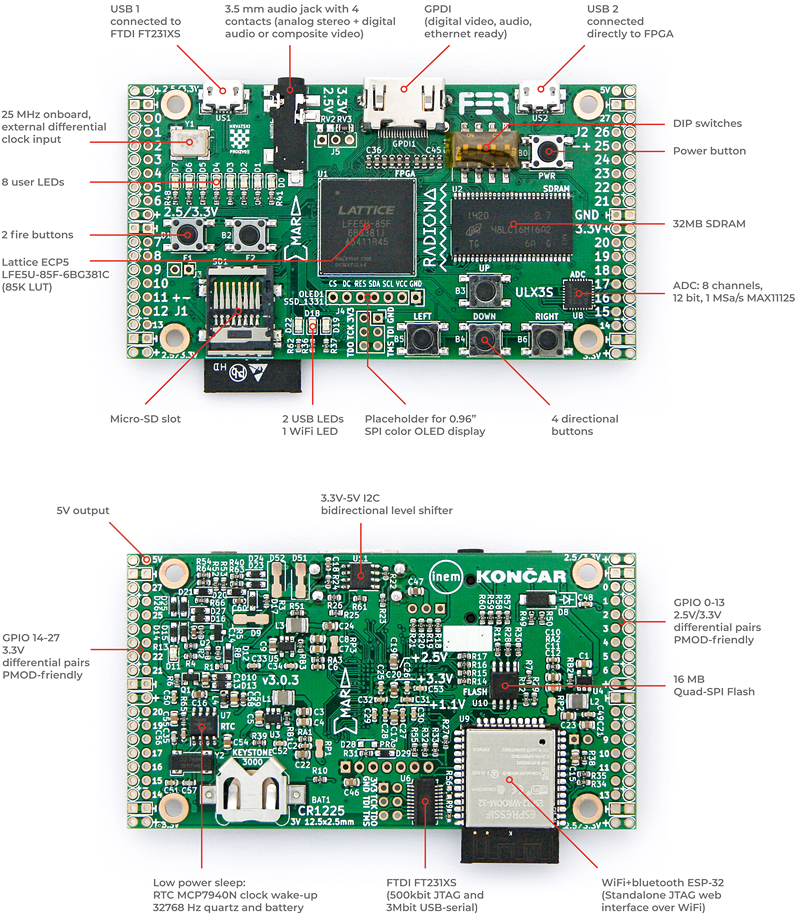
One of the first things I noticed is that there are TWO micro-USB ports:

ULX3S Board Diagram, from http://radiona.org/ulx3s/
One of them is used for JTAG, connected to a  FTDI FT231XS chip. The other is "connected directly to FPGA". Despite having reviewed the online documentation prior to board arrival, I admit I was surprised to see the two USB connectors. (Uh-oh; which do I use?? will there be ground-loop problem if I use them both?) The feature list only names the one used for JTAG, but both are of course clearly labeled on the diagram (see above); Interesting how one sees things differently when actually holding the physical item.

There are a bunch of interesting links for the ulx3s here.

I received a suggestion that I should first test board with this repo: github.com/emard/ulx3s-bin

There's some information on using JTAG with the ULX3S here: github.com/emard/ulx3s-bin.

My board came with what appeared to be a preloaded WiFi AP (source code should be this one). Goran also suggested that:
for using web interface you will need passthru sample; with ujprog you will program this file and you use -j FLASH option:
ujprog -j FLASH passthru_ulx3s_v20_12k.bit
then power off board. Power on with SD card with config file and it will connect to your network then you can use web interface to upload sram.svf files to SD card and program then from WEB interface or use buttons and OLED.

(I didn't actually do this yet)

To use the WiFi AP, a file called ulx3s-wifi.conf should be placed on a fat32 formated SD card:
{
  "host_name": "ULX3S",
  "ssid": "MyMagicSSID",
  "password": "WiFiPassWord8675309",
  "http_username": "user",
  "http_password": "pass"
}

I installed an 8GB SD card that I had used for a Raspberry Pi (I left all the RPi files) - but it did not seem to be used when I connected to the ESP32 AP. I was unable to connect with Windows 10. It seemed to see there was a "problem" in that there was no internet connectivity (duh). I had more success with my phone, connecting to the address shown on the SPI display:  http://192.168.1.4.1/  - however I was not prompted for a WiFi password, nor a username / password. I suspect somehow the SD card was not detected / not used.

The tools include a forked version of OpenOCD (oddly, no PR's accepted, no ability to open issues). Heads up that some fetches are from https://repo.or.cz/ (not sure why everything is not hosted on GitHub, this certainly makes PR's a bit less convenient - but no issue if not accepted anyhow). I built mine for some JTAG devices I had on hand, as I was not sure what "auto" meant (install if found? install everything?).
sudo apt-get install make libtool pkg-config autoconf automake texinfo libusb-1.0-0-dev
git clone https://github.com/emard/openocd.git ulx32_OpenOCD
cd ulx32_OpenOCD
./bootstrap 
./configure --prefix=/home/$USER/workspace --enable-ftdi --enable-ft232r --enable-stlink  --enable-usb-blaster --enable-jlink  --enable-buspirate
make
sudo make install
So ok, that didn't initially work for me. I ended up with this "error: libusb-1.x is required for the MPSSE mode of FTDI based devices" message:
...
checking whether to build a release... no
checking whether to build Doxygen as HTML... yes
checking whether to build Doxygen as PDF... no
checking whether to enable verbose JTAG I/O messages... no
checking whether to enable verbose USB I/O messages... no
checking whether to enable verbose USB communication messages... no
checking whether to enable malloc free space logging... no
checking whether to enable ZY1000 minidriver... no
checking whether to enable dummy minidriver... no
checking whether standard drivers can be built... yes
checking for LIBUSB1... no
configure: WARNING: libusb-1.x not found, trying legacy libusb-0.1 as a fallback; consider installing libusb-1.x insteadchecking for LIBUSB0... yes
checking for HIDAPI... no
checking for LIBFTDI... no
checking for LIBFTDI... yes
checking for LIBJAYLINK... no
configure: error: libusb-1.x is required for the MPSSE mode of FTDI based devices
The solution was to install libusb-1.0-0-dev. (added, above to apt-get install; many thanks to daveshah1 for that tip) Afterwards, all was well:

Enabled transports:
 - USB ............................ yes
 - TCP ............................ yes


OpenOCD configuration summary
--------------------------------------------------
MPSSE mode of FTDI based devices        yes
ST-Link JTAG Programmer                 yes
TI ICDI JTAG Programmer                 yes (auto)
Keil ULINK JTAG Programmer              yes (auto)
Altera USB-Blaster II Compatible        yes (auto)
Bitbang mode of FT232R based devices    yes
Versaloon-Link JTAG Programmer          yes (auto)
TI XDS110 Debug Probe                   yes (auto)
OSBDM (JTAG only) Programmer            yes (auto)
eStick/opendous JTAG Programmer         yes (auto)
Andes JTAG Programmer                   yes (auto)
USBProg JTAG Programmer                 yes (auto)
Raisonance RLink JTAG Programmer        yes (auto)
Olimex ARM-JTAG-EW Programmer           yes (auto)
CMSIS-DAP Compliant Debugger            no
Cypress KitProg Programmer              no
Altera USB-Blaster Compatible           yes
ASIX Presto Adapter                     yes (auto)
OpenJTAG Adapter                        yes (auto)
SEGGER J-Link Programmer                yes

Despite the instructions, @emard commented on gitter:
Don't use my openocd, it's obsolete (I should remove). Use latest mainstream OpenOCD, they included my patch 
That fork of OpenOCD was from github.com/ntfreak/openocd

Unfortunately, I was once again reminded that USB devices are not supported on WSL. For instance:
$ lsusb -t
/sys/bus/usb/devices: No such file or directory
Although I was able to get around this with the TinyFPGA that could use either USB or TTY drivers, OpenOCD does not. It uses only USB drivers. So I ended up downloading a pre-built binary for OpenOCD on Windows. That didn't initially work either - as the default drivers that Windows installed were the FTDI ones:


As the error appeared that OpenOCD was looking for the libusb drivers:
GNU MCU Eclipse 64-bit Open On-Chip Debugger 0.10.0+dev-00462-gdd1d90111 (2019-01-18-11:42)
Licensed under GNU GPL v2
For bug reports, read
        http://openocd.org/doc/doxygen/bugs.html
Info : only one transport option; autoselect 'jtag'
FT232R num: TCK = 5 DSR
FT232R num: TMS = 6 DCD
FT232R num: TDI = 7 RI
FT232R num: TDO = 3 CTS
FT232R num: TRST = 2 RTS
FT232R num: SRST = 4 DTR
adapter speed: 1000 kHz
Error: libusb_open() failed with LIBUSB_ERROR_NOT_SUPPORTED
Error: ft232r not found: vid=0403, pid=6015, serial=[any]
Zadig to the rescue once again, forcing a change to the drivers to libusbK:

This worked! OpenOCD found the Lattice FPGA:
GNU MCU Eclipse 64-bit Open On-Chip Debugger 0.10.0+dev-00462-gdd1d90111 (2019-01-18-11:42)
Licensed under GNU GPL v2
For bug reports, read
        http://openocd.org/doc/doxygen/bugs.html
Info : only one transport option; autoselect 'jtag'
FT232R num: TCK = 5 DSR
FT232R num: TMS = 6 DCD
FT232R num: TDI = 7 RI
FT232R num: TDO = 3 CTS
FT232R num: TRST = 2 RTS
FT232R num: SRST = 4 DTR
adapter speed: 1000 kHz
Info : clock speed 1000 kHz
Info : JTAG tap: lfe5u12.tap tap/device found: 0x21111043 (mfg: 0x021 (Lattice Semi.), part: 0x1111, ver: 0x2)
Warn : gdb services need one or more targets defined
   TapName             Enabled  IdCode     Expected   IrLen IrCap IrMask
-- ------------------- -------- ---------- ---------- ----- ----- ------
 0 lfe5u12.tap            Y     0x21111043 0x21111043     8 0x05  0xff
open("bitstream.svf"): No such file or directory
svf svf [-tap device.tap]  [quiet] [nil] [progress] [ignore_error]
xsvf (tapname|'plain') filename ['virt2'] ['quiet']
I ran OpenOCD like this, as decribed in the docs:
openocd.exe --file=ft231x.ocd --file=ecp5-XXf.cfg
with the contents of ft231x.ocd:
interface ft232r
ft232r_vid_pid 0x0403 0x6015
# ULX3S specific GPIO setting
ft232r_tck_num DSR
ft232r_tms_num DCD
ft232r_tdi_num RI
ft232r_tdo_num CTS
# trst/srst are not used but must have different values than above
ft232r_trst_num RTS
ft232r_srst_num DTR
adapter_khz 1000
and ecp5-XXf.cfg:

telnet_port 4444
gdb_port 3333

# JTAG TAPs
jtag newtap lfe5u12 tap -expected-id 0x21111043 -irlen 8 -irmask 0xFF -ircapture 0x5
#jtag newtap lfe5u25 tap -expected-id 0x41111043 -irlen 8 -irmask 0xFF -ircapture 0x5
#jtag newtap lfe5u45 tap -expected-id 0x41112043 -irlen 8 -irmask 0xFF -ircapture 0x5
#jtag newtap lfe5u85 tap -expected-id 0x41113043 -irlen 8 -irmask 0xFF -ircapture 0x5

init
scan_chain
svf -tap lfe5u12.tap -quiet -progress bitstream.svf
shutdown


 Make the ujprog (ULX2S / ULX3S JTAG programmer)
git clone https://github.com/f32c/tools.git f32c_tools
cd f32c_tools/ujprog
cp Makefile.linux Makefile
make

Usage for ujprog programmer:
ULX2S / ULX3S JTAG programmer v 3.0.92 (built Feb  8 2019 15:32:33)
Usage: ujprog [option(s)] [bitstream_file]

 Valid options:
  -p PORT       Select USB JTAG / UART PORT (default is 0)
  -P TTY        Select TTY port (valid only with -t or -a)
  -j TARGET     Select bitstream TARGET as SRAM (default) or FLASH (XP2 only)
  -f ADDR       Start writing to SPI flash at ADDR, optional with -j flash
  -s FILE       Convert bitstream to SVF FILE and exit
  -r            Reload FPGA configuration from internal Flash (XP2 only)
  -t            Enter terminal emulation mode after completing JTAG operations
  -b SPEED      Set baudrate to SPEED (300 to 3000000 bauds)
  -e FILE       Send and execute a f32c (MIPS/RISCV) binary FILE
  -x SPEED      Set binary transfer speed, optional with -e
  -a FILE       Send a raw FILE
  -d            debug (verbose)
  -D DELAY      Delay transmission of each byte by DELAY ms
  -q            Suppress messages

Make the ftx-prog programmer:
git clone https://github.com/richardeoin/ftx-prog.git
cd ftx-prog
make

Usage for ftx-prog:
ftx_prog: version 0.2
Modified for the FT-X series by Richard Meadows

Based upon:
ft232r_prog: version 1.23, by Mark Lord.

Usage:  ftx_prog [ ]..

where  must be any of:
    --help                                  # (show this help text)
    --dump                                  # (dump eeprom settings to stdout)
    --verbose                               # (show debug info and raw eeprom contents)
    --save                       <file>     # (save original eeprom contents to file)
    --restore                    <file>     # (restore initial eeprom contents from file)
    --8bit-strings                        # (byte strings)
    --cbus  [1..7]  [Tristate|RxLED|TxLED|TxRxLED|PWREN|SLEEP|Drive_0|Drive_1|GPIO|TXDEN|CLK24MHz|CLK12MHz|CLK6MHz|BCD_Charger|BCD_Charger#|I2C_TXE|I2C_RXF|VBUS_Sense|BitBang_WR|BitBang_RD|Time_Stamp|Keep_Awake]
    --manufacturer               <string>   # (new USB manufacturer string)
    --product                    <string>   # (new USB product name string)
    --old-serial-number          <string>   # (current serial number of device to be reprogrammed)
    --new-serial-number          <string>   # (new USB serial number string)
    --max-bus-power              <number>   # (max bus current in milli-amperes)
    --suspend-pull-down          [on|off]   # (force I/O pins into logic low state on suspend)
    --load-vcp                   [on|off]   # (controls if the VCP drivers are loaded)
    --remote-wakeup              [on|off]   # (allows the interface to be woken up by something other than USB)
    --ft1248-cpol                [high|low] # (set the clock polarity on the FT1248 interface to active high or active low)
    --ft1248-bord                [msb|lsb]  # (set the bit order on the FT1248 interface to msb first or lsb first)
    --ft1248-flow-control        [on|off]   # (flow control for FT1248 interface)
    --i2c-schmitt                [on|off]   # (schmitt trigger on I2C interface)
    --i2c-slave-address          <number>   # (I2C slave address)
    --i2c-device-id              <number>   # (I2C device ID)
    --rs485-echo-supp            [on|off]   # (enable echo supression on the RS485 bus)
    --old-vid                    <number>   # (current vendor id of device to be reprogrammed, eg. 0x0403)
    --old-pid                    <number>   # (current product id of device to be reprogrammed, eg. 0x6001)
    --new-vid                    <number>   # (new/custom vendor id to be programmed)
    --new-pid                    <number>   # (new/custom product id be programmed)
    --invert  [txd|rxd|rts|cts|dtr|dsr|dcd|ri]
    --self-powered               [on|off]   # (specify if chip is bus-powered or self-powered)
    --ignore-crc-error                      # Ignore CRC errors and continue
    --erase-eeprom                          # Erase the EEPROM and exit

So that's my first day with the ULXS3. Pretty cool so far. Stay tuned for more...

Resources, Inspiration, Credits, and Other Links:

Sunday, February 3, 2019

Reinstalling WSL Ubuntu (prep for TinyFPGA RISC-V toolchain)

In my prior blogs, I wrote about the difficulties I encountered in using WSL for the TinyFPGA Verilog tool chain.

TL;DR - Run wslconfig /u Ubuntu in a DOS command prompt. WSL may need to be manually deleted by uninstalling and removing the CanonicalGroupLimited.Ubuntu{...} directory in %USERPROFILE%\AppData\Local\Packages\. Uninstall the Windows "Apps & Features" Ubuntu app, then visit https://aka.ms/wslstore
and re-install Ubuntu app.

As a reminder, do not modify WSL filesystem file from Windows! Yes, I've seen some pretty weird things happen when I tested that. But feel free to edit any other files. For instance, the entire C:\ directory is available in WSL as /mnt/c/.

As it turns out, the biggest problem was the version of Ubuntu I had. Although I didn't think I had it installed for all that long - it was way outdated. 

The first thing to do: completely wipe out the old Ubuntu. I found some instructions on removing Ubuntu - that included both of these options:

From DOS Prompt:
lxrun /uninstall /full
or also from DOS Prompt:
DEL /S %localappdata%\lxss\
I didn't have the lxrun command, nor a C:\Users\gojimmypi\AppData\Local\lxss directory. I tried DOS command prompt, a powershell prompt, the Windows bash prompt (C:\Windows\system32\bash.exe) and Ubuntu prompt. Indeed according to Microsoft, lxrun is deprecated as of Windows 10 1803 and later. As noted in a prior blog, my Ubuntu was installed in this directory:
C:\Users\gojimmypi\AppData\Local\Packages\CanonicalGroupLimited.UbuntuonWindows_79rhkp1fndgsc\LocalState\rootfs\home\gojimmypi
To help find it, you can run a command like this in your WSL instance:
echo wow > ~/zowie.tag
then from a DOS command-prompt:
C:\Users\gojimmypi>dir zowie.tag /s
 Volume in drive C is Windows
 Volume Serial Number is 9078-2015

 Directory of C:\Users\gojimmypi\AppData\Local\Packages\CanonicalGroupLimited.UbuntuonWindows_79rhkp1fndgsc\LocalState\rootfs\home\gojimmypi

02/03/2019  01:43 PM                 4 zowie.tag
               1 File(s)              4 bytes


So in my case, Ubuntu needed to be removed from

 C:\Users\gojimmypi\AppData\Local\Packages\CanonicalGroupLimited.UbuntuonWindows_79rhkp1fndgsc

I was reluctant to try the brute-force directory deletion  route. In part, I've seen where Windows did not "see" the proper file sizes and permissions. I eventually found the wslconfig command.

del CanonicalGroupLimited.UbuntuonWindows_79rhkp1fndgsc /s /q > null:wslconfig /list
pause
wslconfig /unregister distroname


That didn't go so well:

And it didn't just fail, but corrupted the install:

Sometimes I really wonder why I continue to fuss with the Microsoft environment. :/

So in the end, I ran the brute-force directoy delete like this:
del CanonicalGroupLimited.UbuntuonWindows_79rhkp1fndgsc /s /q > null:
wslconfig /unregister distroname
The /s deletes all subdirectories. The /q is "quiet mode" (don't confirm every directory to delete), and I send output to null: as the RISC-V toolchain is massive, and showing all that on the screen would take forever. That actually didn't work, either - leaving behind a ton of directories. So then I tried:
rmdir CanonicalGroupLimited.UbuntuonWindows_79rhkp1fndgsc /s /q
which also did not work, giving an error: CanonicalGroupLimited.UbuntuonWindows_79rhkp1fndgsc\LOCALS~1\rootfs\lib\recovery-mode - The directory is not empty. So I continued to manually delete directories manually until everything was gone. Running WSL from a DOS command prompt shows that nothing is installed:

So on to installing Ubuntu fresh from the Microsoft Store - Linux on Windows upon launching the Ubuntu, we should be able to confirm we have version 18.04 installed:
Installing, this may take a few minutes...
Please create a default UNIX user account. The username does not need to match your Windows username.
For more information visit: https://aka.ms/wslusers
Enter new UNIX username: gojimmypi
Enter new UNIX password:
Retype new UNIX password:
passwd: password updated successfully
Installation successful!
To run a command as administrator (user "root"), use "sudo ".
See "man sudo_root" for details.

gojimmypi@HOSTNAME:~$ lsb_release -a
No LSB modules are available.
Distributor ID: Ubuntu
Description:    Ubuntu 18.04.1 LTS
Release:        18.04
Codename:       bionic

You may wish to setup a custom bash prompt like mine (or see bashrcgenerator.com).


Finally on to installing the tool chain again. I've created a TinyFPGA install gist:
mkdir -p ~/workspace/
cd ~/workspace/
git clone https://gist.github.com/243fc3a6eead72ae3db8fd32f2567c96.git TinyFPGA_Toolchain
cd TinyFPGA_Toolchain
chmod +x TinyFPGA_Toolchain.sh
sudo ./TinyFPGA_Toolchain.sh

Or if you prefer:
sudo ls # pause if copy/paste password prompt
sudo apt-get update --assume-yes
sudo apt-get upgrade --assume-yes

mkdir -p ~/workspace/

cd ~/workspace/
# install icestorm dependencies
# this next install needs a bit of disk space:
#   0 upgraded, 205 newly installed, 0 to remove and 3 not upgraded.
#   Need to get 130 MB of archives.
#   After this operation, 652 MB of additional disk space will be used.
#
sudo apt-get install build-essential clang bison flex libreadline-dev \
                     gawk tcl-dev libffi-dev git mercurial graphviz   \
                     xdot pkg-config python python3 libftdi-dev  --assume-yes

# tinyFPGA BX
git clone --recursive https://github.com/tinyfpga/TinyFPGA-BX.git
cd ~/workspace/

# icestorm
git clone https://github.com/cliffordwolf/icestorm.git icestorm
cd icestorm
make -j$(nproc)
sudo make install
cd ~/workspace/

# arachne-pnr
git clone https://github.com/cseed/arachne-pnr.git arachne-pnr
cd arachne-pnr
make -j$(nproc)
sudo make install
cd ~/workspace/

# nextpnr
git clone https://github.com/YosysHQ/nextpnr.git
# this next line is about another half gig of files!
#   0 upgraded, 249 newly installed, 0 to remove and 3 not upgraded.
#   Need to get 132 MB of archives.
#   After this operation, 623 MB of additional disk space will be used.
#
sudo apt-get install libboost-all-dev python3-dev qt5-default clang-format

cd nextpnr
cmake -DARCH=ice40 .
make -j$(nproc)
sudo make install
cd ~/workspace/

# yosys
git clone https://github.com/cliffordwolf/yosys.git yosys
cd yosys
make -j$(nproc)
sudo make install
cd ~/workspace/

#RISC-V
git clone https://github.com/cliffordwolf/picorv32.git

sudo mkdir /opt/riscv32i
sudo chown $USER /opt/riscv32i

sudo apt-get install autoconf automake autotools-dev curl libmpc-dev \
        libmpfr-dev libgmp-dev gawk build-essential bison flex texinfo \
    gperf libtool patchutils bc zlib1g-dev git libexpat1-dev  --assume-yes

        Follow @gojimmypi  

Wednesday, January 30, 2019

WSL GUI - Using Cygwin X-Server for Graphical Interface

As noted in my prior blog on nextpnr, WSL does not support graphic apps. Yes, in this case nextpnr is a Qt application that should compile in Windows. However, my entire toolchain is currently in WSL. Besides, I simply wanted to see if I could persuade a GUI app to work in WSL. I had used XMing X-windows in the past (click-bait ads on this softonic site, beware). My prior OpenWRT / Wireshark exercise worked well with XMing. However I could not get XMing to work with the latest version of WSL (Ubuntu 18.04 on Windows) so I tried Cygwin instead.

TL;DR: Install Cygwin/X to Windows, consider copy of .Xauthority and then launch the Cygwin server like this:
C:\cygwin64\bin\run.exe --quote /usr/bin/bash.exe -l -c "cd; exec /usr/bin/startxwin -- -listen tcp -nowgl"
Apparently every Cygwin user must have a corresponding Windows user. The user in WSL is not the Cygwin user.

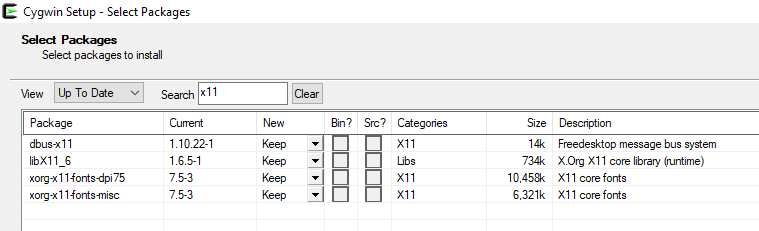
Details: I selected all and only components related to "xorg":


Don't let the small numbers for download size fool you. I ended up with nearly 4GB in my local C:\cygwin64 - install takes a very long time.

In WSL:
# DOS (default C:\cygwin64\bin\) run.exe call to startxwin calls cygwin bash: "/usr/bin/XWin :0 ..." 
export DISPLAY=:0 # you may wish you put in this your ~/.bashrc
 
# copy the Cygwin/X user file to the WSL current user home directory
cp /mnt/c/cygwin64/home/gojimmypi/.Xauthority   ~/.Xauthority
Note that the username / security context in the DOS Windows may be different depending on the username selected when installing the Ubuntu WSL. When running a GUI app in WSL, remember that security is handled by the app started from the DOS prompt.

xclock can be a simple and useful X-Windows app to test if the XServer is working, and can be found in x11-apps:
sudo apt-get install x11-apps
xclock 
The default XWin Server launch as installed does not work for our WSL exercise:
C:\cygwin64\bin\run.exe --quote /usr/bin/bash.exe -l -c "cd; exec /usr/bin/startxwin"
Note: every time you attempt to launch the Cygwin X-Windows Server from a DOS prompt, you should close all running instances in the task bar before opening another. (mine was in the same pop-up menu on the taskbar where USB devices can be disconnected)

To properly launch a Cygwin X-Server for WSL, from a DOS command prompt, launch cygwin with two extra parameters: -- -listen tcp and -nowgl like this:
C:\cygwin64\bin\run.exe --quote /usr/bin/bash.exe -l -c "cd; exec /usr/bin/startxwin -- -listen tcp -nowgl"
The last two options are rather important. Prior to this exercise, I had never used cygwin, so this did take a bit of time to figure out. I've included some of the errors and solutions. Hopefully this document will help others avoid this frustration.

Without setting export DISPLAY=:0 in WSL, this error appears when trying to run xclock in WSL:
Error: Can't open display:
This is of course the same error when the X-Server is not running. Alternatively for nextpnr, we'd see this error:
QStandardPaths: XDG_RUNTIME_DIR not set, defaulting to '/tmp/runtime-gojimmypi'
qt.qpa.screen: QXcbConnection: Could not connect to display
Could not connect to any X display.
Without launching from DOS command prompt with -listen tcp, I saw this same error, as if the server was not running at all:
QStandardPaths: XDG_RUNTIME_DIR not set, defaulting to '/tmp/runtime-gojimmypi'
qt.qpa.screen: QXcbConnection: Could not connect to display :0
Could not connect to any X display.
Without the -nowgl option, I saw this error:
$ nextpnr-ice40 --gui
QStandardPaths: XDG_RUNTIME_DIR not set, defaulting to '/tmp/runtime-gojimmypi'
No XVisualInfo for format QSurfaceFormat(version 2.0, options QFlags(), depthBufferSize -1, redBufferSize 1, greenBufferSize 1, blueBufferSize 1, alphaBufferSize -1, stencilBufferSize -1, samples 1, swapBehavior QSurfaceFormat::SwapBehavior(SingleBuffer), swapInterval 1, profile  QSurfaceFormat::OpenGLContextProfile(CoreProfile))
Falling back to using screens root_visual.
Could not initialize GLX
Aborted (core dumped)
This error means you need a fresh copy of the .Xauthority from cygwin to WSL:
~$ nextpnr-ice40 --gui
QStandardPaths: XDG_RUNTIME_DIR not set, defaulting to '/tmp/runtime-gojimmypi'
Invalid MIT-MAGIC-COOKIE-1 keyqt.qpa.screen: QXcbConnection: Could not connect to display :0
Could not connect to any X display.


Resources, Inspiration, Credits, and Other Links:

        Follow @gojimmypi  

Sunday, January 27, 2019

RISC-V on tinyFPGA-BX via WSL with nextpnr - Part 3

After getting the tinyFPGA working with the yosys / Arachne-PNR / icestorm toolchain as noted in my prior blog, I wanted to try out NextPNR (the Arachne-PNR replacement). This turned out to be a bit of a bumpy ride. Yes, I know it's no fun if it is too easy, but I wonder if I'm approaching my maximum fun capacity? (spoiler: no, this is awesome!)

TL;DR. WSL Ubuntu 16.04 or later is needed. There's a known problem with NextPNR that prohibits the GUI version from compiling. The tinyFPGA has a iCE40LP8K-CM81; two parameters required: --lp8k and --package cm81. The iCEstick has a iCE40HX-1k on board.


First, it seemed that everything I had was the wrong version. apt-get update / upgrade does not really update as much as one might like. So I first updated CMake and Python:

cmake --version
sudo apt-get remove cmake
sudo apt-get install cmake3

sudo apt-get remove 'python3.*'
sudo apt-get install python3.5-dev


Next, I encountered a boost issue, similar to nextpnr issue 129 - cmake: "Could NOT find Boost -- Boost version: 1.58.0". Then I had this annoying problem where cmake Could NOT find PythonInterp: (even though Python 3.5.2 is installed). The problem here was simply that I ran CMake before having the proper version of dependencies installed and the error was cached in CMakeCache.txt !! Simply removing (or renaming) the file resolved that - however, I then encountered yet another boot problem (issue 215: CheckSymbolExists.c:(.text+0x16): undefined reference to `pthread_create'). This one turned out to be that I had Ubuntu 14.04 and needed something newer (thanks to @daveshah1 for pointing this out) - despite the icestorm tools explicitly naming Ubuntu 14.04

Here's how I upgraded my WSL Ubuntu to the latest version (16.04):
sudo ls # pause if copy/paste for password prompt
sudo apt-get update --assume-yes
sudo apt-get upgrade --assume-yes
sudo apt-get install update-manager-core  --assume-yes
sudo do-release-upgrade
sudo apt-get update
sudo apt-get dist-upgrade

# doing this wiped out CMake, so I had to reinstall:
wget http://www.cmake.org/files/v3.13/cmake-3.13.3.tar.gz
tar xf cmake-3.13.3.tar.gz
cd cmake-3.13.3
./configure
make
sudo make install
cmake --version

# pip was also wiped out (despite Python 3.6 being listed for tinyFBGA install, tinyprog is installed with pip, not pip3)
sudo apt-get install python3-pip
sudo apt-get install python-pip
Then install the nextpnr dependencies:
sudo apt-get update
sudo apt-get upgrade
sudo apt-get install libboost-all-dev
sudo apt-get install python3-dev
sudo apt-get install qt5-default
sudo apt-get install clang-format
My final, working Makefile for getting the picosoc RISC-V example onto the tinyFPGA looks like this:
upload: hardware.bin firmware.bin
        tinyprog --com /dev/ttyS8 -p hardware.bin -u firmware.bin


hardware.blif: hardware.v spimemio.v simpleuart.v picosoc.v picorv32.v
        yosys -ql hardware.log -p 'synth_ice40 -top hardware -blif hardware.blif -json hardware.json ' $^

hardware.asc: hardware.pcf hardware.blif
        # arachne-pnr -r -d 8k -P cm81 -o hardware.asc -p hardware.pcf hardware.blif
        nextpnr-ice40 --lp8k --package cm81 --json hardware.json --pcf hardware.pcf --asc hardware.asc

hardware.bin: hardware.asc
        icetime -d hx8k -c 12 -mtr hardware.rpt hardware.asc
        icepack hardware.asc hardware.bin


firmware.elf: sections.lds start.S firmware.c
        /opt/riscv32ic/bin/riscv32-unknown-elf-gcc -march=rv32imc -nostartfiles -Wl,-Bstatic,-T,sections.lds,--strip-debu$
firmware.bin: firmware.elf
        /opt/riscv32ic/bin/riscv32-unknown-elf-objcopy -O binary firmware.elf /dev/stdout > firmware.bin


clean:
        rm -f firmware.elf firmware.hex firmware.bin firmware.o firmware.map \
              hardware.blif hardware.log hardware.asc hardware.rpt hardware.bin

What versions are installed?
lsb_release -a
python --version
python3.5 --version
cmake --version
clang --version
echo qtf_default $(apt-cache show qt5-default | grep -m1 Version)
echo libboost-all-dev $(apt-cache show libboost-all-dev | grep -m1 Version)

for pk in build-essential clang bison flex libreadline-dev \
          gawk tcl-dev libffi-dev git mercurial graphviz   \
          xdot pkg-config python python3 libftdi-dev \
          qt5-default python3-dev libboost-dev; \
  do echo "$pk" $(apt-cache show "$pk" | grep -m1 Version); done

nextpnr-ice40 --version
yosys -V
/opt/riscv32ic/bin/riscv32-unknown-elf-gcc -v
pip --version
echo apio [pip]      $(pip  list | grep apio)
echo apio [pip3]     $(pip3 list | grep apio)
echo tinyprog [pip]  $(pip  list | grep tinyprog)
echo tinyprog [pip3] $(pip3 list | grep tinyprog)
Once nextpnr is all compiled, then next thing is to run it in GUI mode! So far, I have been unsuccessful here. At first, I tried to use the MingX, in the same way I did for my OpenWRT / Wireshark exercise. Despite working just fine on an older Ubuntu 14.4, this new 16.4 simply refused to play.

So instead, I tried CygWin/X - I fussed with it for quite some time before I eventually found a useful hint. First, run Cygwin installer. I selected all of the "X11" and "Xorg" items:


Next, in WSL:
export DISPLAY=:0 # you may wish you put in this your ~/.bashrc
The hint I found was that that I needed to start cygwin X-Server like this:
C:\cygwin64\bin\run.exe --quote /usr/bin/bash.exe -l -c "cd; exec /usr/bin/startxwin -- -listen tcp"
Specifically adding that -- -listen tcp command-line parameter. I also needed to copy the .Xauthority file from my cygwin home, to my WSL home. (yes, I know this is getting more kludgey with each step):
cp /mnt/c/cygwin64/home/gojimmypi/.Xauthority  .Xauthority
without doing this, I had an Authorization error like this:
$ xclock
Authorization required, but no authorization protocol specified
Error: Can't open display: :0
The xclock test works just fine: no errors. I'm able to get wireshark to run but I do see some warnings.
Sadly, nextpnr will not launch at all:
$ nextpnr-ice40 --gui
Could not initialize OpenGL for RasterGLSurface, reverting to RasterSurface.
Could not initialize GLX
Aborted (core dumped)
I tried using the export LIBGL_USE_WGL=1 as suggested here, but no change in outcome. I tried the glxinfo | grep OpenGL, but didn't have it installed. Next:
sudo apt-get install mesa-utils
glxinfo | grep OpenGL
This resulted in a new error: Error: couldn't find RGB GLX visual or fbconfig. I then tried to install more of the OpenGL stuff as suggested here. (no change in results)
sudo apt-get install libglu1-mesa-dev freeglut3-dev mesa-common-dev
Still no joy. I'm happy to have nextpnr working in command-line mode, and have successfully used it with the RISC-V on the TinyFPGA instead of Arachne-PNR, but I would have really like to have been able to see the GUI.

Friday, January 4, 2019

RISC-V on FPGA (the tinyFPGA) via WSL - Part 2

In my previous blog, I wrote about the problems I encountered with programming the tinyFPGA BX in the Windows Subsystem for Linux (WSL). Now that I have that resolved, onto something much more interesting: installing the RISC-V (specifically the PicoRV32) soft CPU onto the tinyFPGA board!

TL;DR - be sure to install all dependencies for WSL. Edit Makefile to call explicit RISC-V compiler (or edit path) and explicitly name the serial port tinyFPGA is plugged into. Use the -r option for arachne-pnr. Be sure to have plenty of disk space (and patience, or a really fast computer)

Now, this is something well outside of my skill set and comfort zone: A soft CPU on an FPGA! Fortunately, Luke posted this awesome RISC-V example project on TinyFPGA BX on the tinyFPGA discourse forum that seemed to be fairly straightforward. The target environment was a "real" Linux machine, I chose WSL, instead.

Note that as of the date of this blog, there are several useful, but not-yet-merged PR's for the tinyFPGA BX repo that are probably useful to review.

I keep all my projects in a /workspace directory, so my tinyFPGA BX clone looks like this:
gojimmypi@MYHOST : ~
0 $ cd ~/workspace
gojimmypi@MYHOST : ~/workspace
0 $ git clone --recursive https://github.com/tinyfpga/TinyFPGA-BX.git
Cloning into 'TinyFPGA-BX'...
remote: Enumerating objects: 108, done.
remote: Total 108 (delta 0), reused 0 (delta 0), pack-reused 108
Receiving objects: 100% (108/108), 648.10 KiB | 250.00 KiB/s, done.
Resolving deltas: 100% (19/19), done.
Checking connectivity... done.
gojimmypi@MYHOST : ~/workspace
See the icestorm install from TinyFPGA-BX icestorm template; I clone all of my GitHub stuff into my ~/workspace directory:
cd ~/workspace/
# install icestorm dependencies
sudo apt-get install build-essential clang bison flex libreadline-dev \
                     gawk tcl-dev libffi-dev git mercurial graphviz   \
                     xdot pkg-config python python3 libftdi-dev

# tinyFPGA BX
git clone --recursive https://github.com/tinyfpga/TinyFPGA-BX.git
cd ~/workspace/

# icestorm
git clone https://github.com/cliffordwolf/icestorm.git icestorm
cd icestorm
make -j$(nproc)
sudo make install
cd ~/workspace/

# arachne-pnr
git clone https://github.com/cseed/arachne-pnr.git arachne-pnr
cd arachne-pnr
make -j$(nproc)
sudo make install
cd ~/workspace/

# yosys
git clone https://github.com/cliffordwolf/yosys.git yosys
cd yosys
make -j$(nproc)
sudo make install
cd ~/workspace/

# picorv32
git clone https://github.com/cliffordwolf/picorv32.git

# see online instructions https://github.com/cliffordwolf/picorv32/blob/master/README.md#building-a-pure-rv32i-toolchain
#
Note that I encountered a permission error for the make download-tools :
Checking connectivity... done.
+ mv /var/cache/distfiles/riscv-gcc.git.part /var/cache/distfiles/riscv-gcc.git
mv: cannot move ‘/var/cache/distfiles/riscv-gcc.git.part’ to ‘/var/cache/distfiles/riscv-gcc.git’: Permission denied
make: *** [download-tools] Error 1
So consider using: sudo make download-tools Note that after I encountered the permission error, even the sudo version returned an error (I think the data was not re-created, rather used existing downloads)... so in order to fix it, I needed to manually adjust permissions:
sudo chmod 666 /var/cache/distfiles/riscv-gcc.git.part
sudo mv /var/cache/distfiles/riscv-gcc.git.part /var/cache/distfiles/riscv-gcc.git

I ended up encountering yet another odd error as well, this GitHub Connection refused:
Submodule 'riscv-qemu' (git://github.com/riscv/riscv-qemu.git) registered for path 'riscv-qemu'
Cloning into 'riscv-qemu'...
fatal: unable to connect to github.com:
github.com[0: 192.30.255.113]: errno=Connection refused
github.com[1: 192.30.255.112]: errno=Connection refused

Clone of 'git://github.com/riscv/riscv-qemu.git' into submodule path 'riscv-qemu' failed
make[1]: *** [build-riscv32i-tools-bh] Error 1
make[1]: Leaving directory `/home/gojimmypi/workspace/picorv32'
make: *** [build-tools] Error 2
I opened a GitHub issue cliffordwolf/picorv32 #106 for this. In short, for some reason my WSL decided to have some sort of "git port is restricted" error for git://. The fix as noted in the issue was:
git config --global url.https://github.com/.insteadOf git://github.com/
To undo this:
git config --global --unset url.https://github.com/.insteadOf
If you prefer to not do this on a global scale, simply remove the --global.

As I was trying to to this in WSL instead of a "real" Linux environment, I stumbled a bit. First - the RISC-V toolchain did not compile - instead ending in a simple "recipe for 'build-tools' failed". Early on in the process, this error was encountered:
checking for the correct version of gmp.h... no
configure: error: Building GCC requires GMP 4.2+, MPFR 2.4.0+ and MPC 0.8.0+.
Try the --with-gmp, --with-mpfr and/or --with-mpc options to specify
their locations.  Source code for these libraries can be found at
their respective hosting sites as well as at
ftp://gcc.gnu.org/pub/gcc/infrastructure/.  See also
http://gcc.gnu.org/install/prerequisites.html for additional info.  If
you obtained GMP, MPFR and/or MPC from a vendor distribution package,
make sure that you have installed both the libraries and the header
files.  They may be located in separate packages.
yes
checking whether stdint.h conforms to C99... Makefile:415: recipe for target 'stamps/build-gcc-newlib-stage1' failed
make[2]: *** [stamps/build-gcc-newlib-stage1] Error 1
make[2]: *** Waiting for unfinished jobs....

It is unfortunate that the build attempt continued, as it takes an incredibly long time on my machine. Eventually it returned with:
make[2]: Leaving directory '/home/gojimmypi/workspace/picorv32/riscv-gnu-toolchain-riscv32i/build'
Makefile:154: recipe for target 'build-riscv32i-tools-bh' failed
make[1]: *** [build-riscv32i-tools-bh] Error 2
make[1]: Leaving directory '/home/gojimmypi/workspace/picorv32'
Makefile:160: recipe for target 'build-tools' failed
make: *** [build-tools] Error 2
A quick google search and I found this helpful how-to on stackoverflow. Although a bit detailed and verbose, the only information I needed was in the sentence:
For Debian based system including Ubuntu, Install libgmp-dev, libmpfr-dev and libmpc-dev packages.
For my Ubuntu-like WSL this translated to:

sudo apt-get install libgmp3-dev --assume-yes
sudo apt-get install libmpfr-dev --assume-yes
sudo apt-get install libmpc-dev  --assume-yes
(TODO: do I need libgmp3-dev or simply libgmp-dev ?)

Update: the TL;DR instructions on simply running the TL;DR Building a pure RV32I Toolchain like this:
make download-tools 
make -j$(nproc) build-tools 

...does not include downloading all of the dependencies. So first use the install shown a few lines down:
sudo apt-get install autoconf automake autotools-dev curl libmpc-dev \
        libmpfr-dev libgmp-dev gawk build-essential bison flex texinfo \
    gperf libtool patchutils bc zlib1g-dev git libexpat1-dev

After that, the build was successful! However, I was still not able to actually call the compiler:
/usr/bin/install -c -m 644 b-header-vars /opt/riscv32imc/lib/gcc/riscv32-unknown-elf/8.2.0/plugin/include/b-header-vars
make[5]: Leaving directory '/home/gojimmypi/workspace/picorv32/riscv-gnu-toolchain-riscv32imc/build/build-gcc-newlib-stage2/gcc'
make[4]: Leaving directory '/home/gojimmypi/workspace/picorv32/riscv-gnu-toolchain-riscv32imc/build/build-gcc-newlib-stage2'
make[3]: Leaving directory '/home/gojimmypi/workspace/picorv32/riscv-gnu-toolchain-riscv32imc/build/build-gcc-newlib-stage2'
mkdir -p stamps/ && touch stamps/build-gcc-newlib-stage2
make[2]: Leaving directory '/home/gojimmypi/workspace/picorv32/riscv-gnu-toolchain-riscv32imc/build'
make[1]: Leaving directory '/home/gojimmypi/workspace/picorv32'
gojimmypi@MYHOST : ~/workspace/picorv32
0 $ riscv32-unknown-elf-gcc
riscv32-unknown-elf-gcc: command not found
Fortunately this was a simple matter of the command not being in the path. I started a fresh WSL instance to be sure, and indeed it was not added to my path. So I manually edited Luke's Makefile to explicitly name the path. I searched from it in DOS, and found several of them in each of these directories (just as described in the instructions):
 Directory of C:\Users\gojimmypi\AppData\Local\Packages\CanonicalGroupLimited.UbuntuonWindows_79rhkp1fndgsc\LocalState\rootfs\opt

01/03/2019  07:47 PM    <DIR>          riscv32i
01/03/2019  09:08 PM    <DIR>          riscv32ic
01/03/2019  10:26 PM    <DIR>          riscv32im
01/03/2019  11:47 PM    <DIR>          riscv32imc
               0 File(s)              0 bytes
In particular, look at those creation dates! The full monty compile took quite a long time on my system. Together, the 4 of them take up over 3GB of disk space in the /opt directory! I'm not sure how accurate that is - as when going to the parent directory in Windows:
C:\Users\gojimmypi\AppData\Local\Packages\CanonicalGroupLimited.UbuntuonWindows_79rhkp1fndgsc\LocalState
The .\LocalState\rootfs directory is less than 2 GB, despite .\LocalState\rootfs\opt containing over 3GB. The reality is that somehow after this exercise, overall my disk has nearly 20GB less free space. :/

Here's what the rootfs directory looks like in Windows File Explorer (rick-click, properties)

However when running this command (note that I piped it to a file, which is much faster than sending 65MB to the screen):
dir C:\Users\gojimmypi\AppData\Local\Packages\CanonicalGroupLimited.UbuntuonWindows_79rhkp1fndgsc\LocalState\rootfs\ /s > myWSL_rootfs.txt
The resultant file size is considerably larger than reported in Windows Explorer:
     Total Files Listed:
           933087 File(s) 31,192,151,953 bytes
           125544 Dir(s)   5,549,752,320 bytes free
Note my local picorv32 from github ended up here on my Windows file system:
C:\Users\gojimmypi\AppData\Local\Packages\CanonicalGroupLimited.UbuntuonWindows_79rhkp1fndgsc\LocalState\rootfs\home\gojimmypi\workspace\picorv32
It appears as /home/gojimmypi/workspace/picorv32 in WSL:
gojimmypi@MYHOST : ~/workspace/picorv32
0 $ pwd
/home/gojimmypi/workspace/picorv32
gojimmypi@MYHOST : ~/workspace/picorv32
0 $ ls
dhrystone  picorv32.core  README.md                      riscv-gnu-toolchain-riscv32im   showtrace.py    testbench.v
firmware   picorv32.v     riscv-gnu-toolchain-riscv32i   riscv-gnu-toolchain-riscv32imc  testbench.cc    testbench_wb.v
Makefile   picosoc        riscv-gnu-toolchain-riscv32ic  scripts                         testbench_ez.v  tests
gojimmypi@MYHOST : ~/workspace/picorv32
0 $
And sure enough: a whopping 20GB!
gojimmypi@MYHOST : ~/workspace/picorv32
0 $ du -h
...
4.9G    ./riscv-gnu-toolchain-riscv32imc
20K     ./scripts/csmith
24K     ./scripts/cxxdemo
16K     ./scripts/icestorm
16K     ./scripts/presyn
32K     ./scripts/quartus
28K     ./scripts/romload
56K     ./scripts/smtbmc
12K     ./scripts/tomthumbtg
40K     ./scripts/torture
36K     ./scripts/vivado
8.0K    ./scripts/yosys
12K     ./scripts/yosys-cmp
300K    ./scripts
205K    ./tests
20G     .
One more thing for future reference: I was not starting with a clean WSL. I don't know if anything I had previously installed was also a missing requirement. Using history | grep "sudo apt-get install", I found that I had previously manually installed these items:
sudo apt-get install gdb
sudo apt-get install libdevice-serialport-perl
sudo apt-get install libyaml-perl
sudo apt-get install binutils
sudo apt-get install build-essential clang bison flex libreadline-dev      
sudo apt-get install gawk tcl-dev libffi-dev git mercurial graphviz
sudo apt-get install xdot pkg-config python python3 libftdi-dev
sudo apt-get install libtool
sudo apt-get install automake
sudo apt-get install make unrar-free autoconf automake libtool gcc g++ gperf
sudo apt-get install flex bison texinfo gawk ncurses-dev libexpat-dev python-dev python python-serial
sudo apt-get install sed git unzip bash help2man wget bzip2
sudo apt-get install lzip
sudo apt-get install extract
sudo apt-get install cu
sudo apt-get install setserial
sudo apt-get install libgmp3-dev
sudo apt-get install libmpfr-dev
sudo apt-get install libmpc-dev
If for some reason you want to install all of these as well:
sudo apt-get install gdb \
                     libdevice-serialport-perl \
                     libyaml-perl \
                     binutils \
                     build-essential clang bison flex libreadline-dev \
                     gawk tcl-dev libffi-dev git mercurial graphviz \
                     xdot pkg-config python python3 libftdi-dev \
                     libtool \
                     automake \
                     make unrar-free autoconf automake libtool gcc g++ gperf \
                     flex bison texinfo gawk ncurses-dev libexpat-dev python-dev python python-serial \
                     sed git unzip bash help2man wget bzip2 \
                     lzip \
                     extract \
                     cu \
                     setserial \
                     libgmp3-dev \
                     libmpfr-dev \
                     libmpc-dev 
Back to calling the compiler: here are the lines I edited in the Makefile to explicitly call the RISC-V compiler I wanted:
firmware.elf: sections.lds start.S firmware.c 
 /opt/riscv32i/bin/riscv32-unknown-elf-gcc -march=rv32imc -nostartfiles -Wl,-Bstatic,-T,sections.lds,--strip-debug,-Map=firmware.map,--cref  -ffreestanding -nostdlib -o firmware.elf start.S firmware.c

firmware.bin: firmware.elf
 /opt/riscv32i/bin/riscv32-unknown-elf-objcopy -O binary firmware.elf /dev/stdout > firmware.bin
One of the things I wondered: once the RISC-V processor is created on the FPGA chip... how to I get it to actually run code that I create? Is there a special "soft-JTAG" created? A "soft-UART"? If so, which pins would be used? Perhaps some sort of bootloader? As it turns out... none of those; the solution is quite simple, thanks to some clever work by Luke when implementing his tinyFPGA board. When using the tinyprog command-line tool, in addition to the -p to program the FPGA, there's a -u option to also upload firmware! And yes - this is the firmware code that the soft RISC-V CPU will execute. Brilliant! Ok, perhaps not the most efficient to recreate the entire CPU when the app changes, but it is certainly easy.

So the "app" that gets compiled by the new RISC-V toolchain is the firmware found here. So ok, clearly there are several un-intuitive things going on there. But it is an excellent template to get started and to learn a tremendous amount this RISC-V implementation in Verilog on an FPGA.

At this point, if the tinyFPGA dependencies are not installed per the TinyFPGA BX User Guide, these commands are needed in WSL (note that indeed Python was pre-installed, but pip was not):
sudo apt-get install python-pip
sudo pip install apio==0.4.0b5 tinyprog
apio install system scons icestorm iverilog
sudo apio drivers --serial-enable
As noted in my previous blog, there were some problems in WSL talking to my tinyFPGA board. Specifically, unlike in DOS, the tinyprog tool does not automatically find my tingFPGA board. Thus another minor change was needed to the Makefile. My tinyFPGA board appears as COM15: in Windows... thus /dev/ttyS15 in WSL. So for the upload part, I changed my Makefile to explicitly name that port:
upload: hardware.bin firmware.bin
        tinyprog --com /dev/ttyS15 -p hardware.bin -u firmware.bin
Also: note that once uploaded, the tinyFPGA powers on into "bootloader mode". Pressing reset apparently returns it to boot loader mode as well. That would seem rather unfortunate for any actual in-the-field projects. I wonder if there's some way to not power on like that?

In order to exit bootloader mode, I use this command:
tinyprog -b -c /dev/ttyS15

Unless you want to run as sudo, I ended up having to adjust the permissions. This command did *not* work for me:
sudo usermod -a -G dialout $USER
Apparently there's an issue with WSL dev/tty permissions so instead I used:
sudo chmod 0666 /dev/ttyS15

When I first plugged in my tinyFPGA, Windows gave the "We're setting up 'Unknown Device'" message. Upon completion, the tinyFPGA did not appear. Unplugging and reinserting resolved this for me. Note that in order to program the tinyFPGA, we do need to be in bootloader mode (press reset on tinyFPGA), otherwise we'll see an error like this:
0 $ make upload
tinyprog --com /dev/ttyS15 -p hardware.bin -u firmware.bin

    TinyProg CLI
    ------------
    Using device id 1d50:6130
Traceback (most recent call last):
  File "/home/gojimmypi/.local/bin/tinyprog", line 11, in 
    sys.exit(main())
  File "/home/gojimmypi/.local/lib/python2.7/site-packages/tinyprog/__main__.py", line 325, in main
    with active_port:
  File "/home/gojimmypi/.local/lib/python2.7/site-packages/tinyprog/__init__.py", line 66, in __enter__
    self.ser = serial.Serial(self.port_name, timeout=1.0, writeTimeout=1.0).__enter__()
  File "/home/gojimmypi/.local/lib/python2.7/site-packages/serial/serialutil.py", line 240, in __init__
    self.open()
  File "/home/gojimmypi/.local/lib/python2.7/site-packages/serial/serialposix.py", line 268, in open
    raise SerialException(msg.errno, "could not open port {}: {}".format(self._port, msg))
serial.serialutil.SerialException: [Errno 5] could not open port /dev/ttyS15: [Errno 5] Input/output error: '/dev/ttyS15'
Makefile:3: recipe for target 'upload' failed
make: *** [upload] Error 1
Also note that I was unable to use the riscv32ic, riscv32ic, or riscv32icm toolchains resulting in errors like this:
...
  pass 198, 1 shared.
  pass 199, 1 shared.
  pass 200, 1 shared.
fatal error: failed to route
Makefile:10: recipe for target 'hardware.asc' failed
make: *** [hardware.asc] Error 1
So unless you know you need those other toolchains for other RISC-V stuff, perhaps best to not waste time (and disk space!) compiling them all.

Note that afterwards, I found that even riscv32i was not working! Upon reinstalling the icestorm toolchain, this was resolved - and I was able to use all 4 of the riscv32i[c][m] flavors.

Here is what I did to rebuild the icestorm / arachne-pnr / yosys toolchain:
# capture copy/paste with an initial sudo command
cd ~/workspace/
sudo ls 

# ensure dependencies are fresh
sudo apt-get update
sudo apt-get upgrade

cd ~/workspace/
# tinyFPGA BX
cd TinyFPGA-BX
git fetch
git pull
cd ~/workspace/

# icestorm
cd icestorm
git fetch
git pull
make clean
make -j$(nproc)
sudo make install
cd ~/workspace/

# arachne-pnr
cd arachne-pnr
git fetch
git pull
make clean
make -j$(nproc)
sudo make install
cd ~/workspace/

# yosys
cd yosys
git fetch
git pull
make clean
make -j$(nproc)
sudo make install
cd ~/workspace/

# tinyFPGA
cd TinyFPGA-BX/examples/picosoc
make clean
make upload

Although at one point the fatal error: failed to route message went away after rebuilding the toolchain, later the error returned with a vengeance. Rebuilding the toolchain didn't actually resolve the routing problem.  The ultimate solution for me here was the relatively new -r option for arachne-pnr. I opened and closed GitHub Issue #133 to help others save the time I wasted trying to resolve this. Specifically, this command:
/usr/local/bin/arachne-pnr -r -d 8k -P cm81 -o hardware.asc -p hardware.pcf hardware.blif
(I included the explicit path here to avoid ambiguity, as I found another apio binary with the same name)

So when arachne-onr is running properly, the output should look like this:

$ /usr/local/bin/arachne-pnr -r -d 8k -P cm81 -o hardware.asc -p hardware.pcf hardware.blif
seed: 2912864674
device: 8k
read_chipdb +/share/arachne-pnr/chipdb-8k.bin...
  supported packages: bg121, bg121:4k, cb132, cb132:4k, cm121, cm121:4k, cm225, cm225:4k, cm81, cm81:4k, ct256, tq144:4k
read_blif hardware.blif...
prune...
read_pcf hardware.pcf...
hardware.pcf:43: warning: no port `pin_3' in top-level module `hardware', constraint ignored.
hardware.pcf:44: warning: no port `pin_4' in top-level module `hardware', constraint ignored.
hardware.pcf:45: warning: no port `pin_5' in top-level module `hardware', constraint ignored.
hardware.pcf:46: warning: no port `pin_6' in top-level module `hardware', constraint ignored.
hardware.pcf:47: warning: no port `pin_7' in top-level module `hardware', constraint ignored.
hardware.pcf:48: warning: no port `pin_8' in top-level module `hardware', constraint ignored.
hardware.pcf:49: warning: no port `pin_9' in top-level module `hardware', constraint ignored.
hardware.pcf:50: warning: no port `pin_10' in top-level module `hardware', constraint ignored.
hardware.pcf:51: warning: no port `pin_11' in top-level module `hardware', constraint ignored.
hardware.pcf:52: warning: no port `pin_12' in top-level module `hardware', constraint ignored.
hardware.pcf:53: warning: no port `pin_13' in top-level module `hardware', constraint ignored.
hardware.pcf:56: warning: no port `pin_14' in top-level module `hardware', constraint ignored.
hardware.pcf:57: warning: no port `pin_15' in top-level module `hardware', constraint ignored.
hardware.pcf:58: warning: no port `pin_16' in top-level module `hardware', constraint ignored.
hardware.pcf:59: warning: no port `pin_17' in top-level module `hardware', constraint ignored.
hardware.pcf:60: warning: no port `pin_18' in top-level module `hardware', constraint ignored.
hardware.pcf:61: warning: no port `pin_19' in top-level module `hardware', constraint ignored.
hardware.pcf:62: warning: no port `pin_20' in top-level module `hardware', constraint ignored.
hardware.pcf:63: warning: no port `pin_21' in top-level module `hardware', constraint ignored.
hardware.pcf:64: warning: no port `pin_22' in top-level module `hardware', constraint ignored.
hardware.pcf:65: warning: no port `pin_23' in top-level module `hardware', constraint ignored.
hardware.pcf:66: warning: no port `pin_24' in top-level module `hardware', constraint ignored.
hardware.pcf:77: warning: no port `pin_25' in top-level module `hardware', constraint ignored.
hardware.pcf:78: warning: no port `pin_26' in top-level module `hardware', constraint ignored.
hardware.pcf:79: warning: no port `pin_27' in top-level module `hardware', constraint ignored.
hardware.pcf:80: warning: no port `pin_28' in top-level module `hardware', constraint ignored.
hardware.pcf:81: warning: no port `pin_29' in top-level module `hardware', constraint ignored.
hardware.pcf:82: warning: no port `pin_30' in top-level module `hardware', constraint ignored.
hardware.pcf:83: warning: no port `pin_31' in top-level module `hardware', constraint ignored.
instantiate_io...
pack...

After packing:
IOs          13 / 63
GBs          0 / 8
  GB_IOs     0 / 8
LCs          5769 / 7680
  DFF        1491
  CARRY      821
  CARRY, DFF 157
  DFF PASS   522
  CARRY PASS 63
BRAMs        20 / 32
WARMBOOTs    0 / 1
PLLs         0 / 1

place_constraints...
promote_globals...
  promoted clk_16mhz$2, 1688 / 1688
  promoted $abc$60698$n19, 555 / 555
  promoted resetn, 326 / 326
  promoted $abc$60698$n4557, 96 / 96
  promoted soc.cpu.pcpi_div.start, 163 / 163
  promoted soc.cpu.pcpi_mul.mul_waiting, 216 / 216
  promoted $abc$60698$n4366, 73 / 74
  promoted $abc$60698$n4562, 64 / 64
  promoted 8 nets
    3 sr/we
    4 cen/wclke
    1 clk
  8 globals
    3 sr/we
    4 cen/wclke
    1 clk
realize_constants...
  realized 1
place...
  initial wire length = 116235
  at iteration #50: temp = 12.916, wire length = 103483
  at iteration #100: temp = 7.34662, wire length = 78330
  at iteration #150: temp = 3.96982, wire length = 52046
  at iteration #200: temp = 1.83918, wire length = 36981
  at iteration #250: temp = 0.150479, wire length = 27126
  at iteration #300: temp = 4.19474e-06, wire length = 26372
  final wire length = 26347

After placement:
PIOs       18 / 63
PLBs       883 / 960
BRAMs      20 / 32

  place time 41.55s
route...
  pass 1, 301 shared.
  pass 2, 150 shared.
  pass 3, 94 shared.
  pass 4, 66 shared.
  pass 5, 33 shared.
  pass 6, 26 shared.
  pass 7, 16 shared.
  pass 8, 14 shared.
  pass 9, 4 shared.
  pass 10, 5 shared.
  pass 11, 3 shared.
  pass 12, 1 shared.
  pass 13, 0 shared.

After routing:
span_4     12877 / 29696
span_12    2247 / 5632

  route time 29.61s
write_txt hardware.asc...
In particular, note how there's only one instance of 1 shared and then it decrements to 0 shared where somehow the error condition seems to get stuck on 1. I have no idea why the "Randomized Seed" fixed this. In the end, my Makefile (in my ~/workspace/TinyFPGA-BX/examples/picosoc looks like this:

upload: hardware.bin firmware.bin
        tinyprog --com /dev/ttyS8 -p hardware.bin -u firmware.bin


hardware.blif: hardware.v spimemio.v simpleuart.v picosoc.v picorv32.v
        yosys -ql hardware.log -p 'synth_ice40 -top hardware -blif hardware.blif' $^

hardware.asc: hardware.pcf hardware.blif
        arachne-pnr -r -d 8k -P cm81 -o hardware.asc -p hardware.pcf hardware.blif

hardware.bin: hardware.asc
        icetime -d hx8k -c 12 -mtr hardware.rpt hardware.asc
        icepack hardware.asc hardware.bin


firmware.elf: sections.lds start.S firmware.c
        /opt/riscv32ic/bin/riscv32-unknown-elf-gcc -march=rv32imc -nostartfiles -Wl,-Bstatic,-T,sections.lds,--strip-de$
firmware.bin: firmware.elf
        /opt/riscv32ic/bin/riscv32-unknown-elf-objcopy -O binary firmware.elf /dev/stdout > firmware.bin


clean:
        rm -f firmware.elf firmware.hex firmware.bin firmware.o firmware.map \
              hardware.blif hardware.log hardware.asc hardware.rpt hardware.bin


As RISC-V is new to me, so is the suffix information. For reference, the values are found in the The RISC-V Instruction Set Manual, specifically Table 22.1 summarizing the standardized subset names:
RISC-V : Standard ISA Subset Naming Convention 
Indeed once the icestorm and RISC-V toolchains are installed, Luke's (deceptively simple) command does it all:
cd  ~/workspace/TinyFPGA-BX/examples/picosoc
make upload
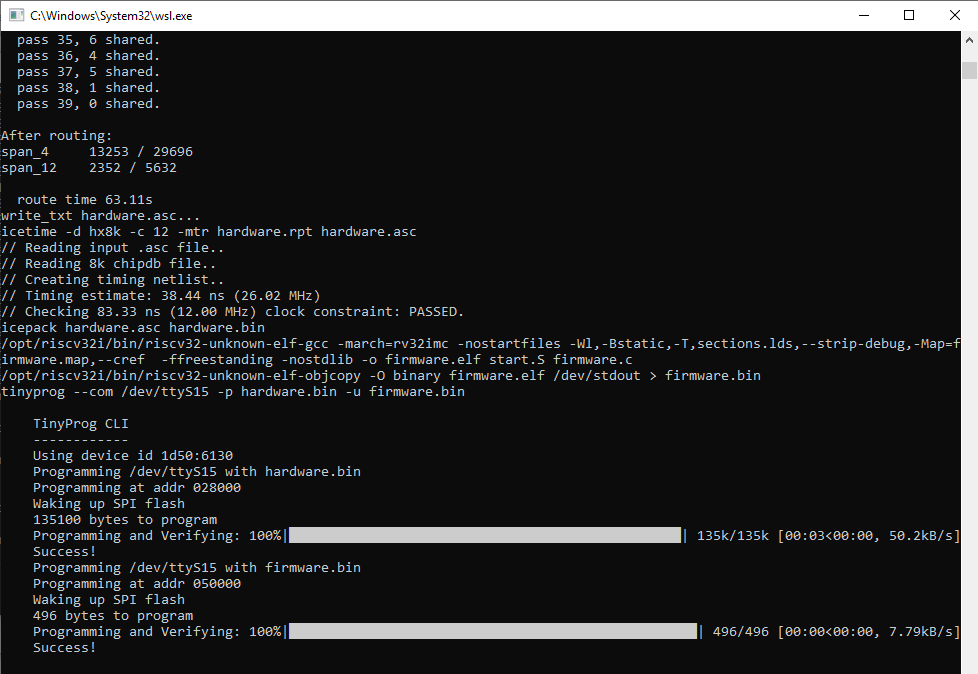
Success should look something like this:
tinyprog --com /dev/ttyS8 -p hardware.bin -u firmware.bin

    TinyProg CLI
    ------------
    Using device id 1d50:6130
    Programming /dev/ttyS8 with hardware.bin
    Programming at addr 028000
    Waking up SPI flash
    135100 bytes to program
    Programming and Verifying: 100%|█████████████████████████████████████████████████| 135k/135k [00:03<00:00 050000="" 100="" 41.0kb="" 496="" 7.46kb="" addr="" and="" at="" bytes="" code="" dev="" firmware.bin="" flash="" program="" programming="" s="" spi="" success="" to="" ttys8="" up="" verifying:="" waking="" with="">

Once code is uploaded and the device returns to bootloader mode (reset or unplugged) - the device can be rebooted to run the RISC-V code like this:
tinyprog -b -c /dev/ttyS8

The reality - is that a crazy amount of rather complex things are accomplished: Creating a soft CPU?!? On an FGPA!? Using Free and Open Source tools?! Then compiling C code for the newly implemented CPU! From the comfort of my home?! Just incredible. My thanks to everyone that has put in so much effort to make this possible: Particularly Luke Valenty (aka @tinyFPGA) and Clifford Wolf (aka @oe1cxw), along with many others. We are living in amazing times.

See my next blog on using nextpnr.

Resources, Inspiration, Credits, and Other Links:


Please leave comments, ideas, suggestions below (moderated, sometimes delayed) or send me a message at gmail, or find gojimmypi on twitter.

Wednesday, January 2, 2019

tinyprog WSL - using TinyFPGA BX in Windows Subsystem for Linux - Part 1

Recently, I encountered a problem getting the tinyFPGA BX to be recognized in WSL. I submitted a WSL issue on GitHub that was acknowledged and promptly closed as a duplicate, as apparently no USB devices are currently supported in WSL. I am almost certain that I previously had this working. A quick Google search, and others appear to be using WSL as well.

TL;DR - I created a gist for the entire WSL toolchain setup for the TinyFPGA.

The problem that I encountered: is that although a Windows DOS prompt sees the device:

C:\Users\gojimmypi>tinyprog

    TinyProg CLI
    ------------
    Using device id 1d50:6130
    Only one board with active bootloader, using it.

WSL does not:

gojimmypi@MYHOST: ~
0 $ tinyprog

    TinyProg CLI
    ------------
    Using device id 1d50:6130
    No port was specified and no active bootloaders found.
    Activate bootloader by pressing the reset button.

Given the comments in my GitHub issue about libusb having never been supported in WSL, I wondered how it could have previously worked? Curiously, I discovered that the tinyFPGA can use either the serial port or the USB drivers (note the last two options: no libusb support in WSL, but COM ports via pyserial should work):

usage: tinyprog [-h] [-l] [-p PROGRAM] [-u PROGRAM_USERDATA]
                [--program-image PROGRAM_IMAGE] [-b] [-c COM] [-i ID]
                [-d DEVICE] [-a ADDR] [-m] [--update-bootloader] [--libusb]
                [--pyserial]

optional arguments:
  -h, --help            show this help message and exit
  -l, --list            list connected and active FPGA boards
  -p PROGRAM, --program PROGRAM
                        program FPGA board with the given user bitstream
  -u PROGRAM_USERDATA, --program-userdata PROGRAM_USERDATA
                        program FPGA board with the given user data
  --program-image PROGRAM_IMAGE
                        program FPGA board with a combined user bitstream and
                        data
  -b, --boot            command the FPGA board to exit the bootloader and load
                        the user configuration
  -c COM, --com COM     serial port name
  -i ID, --id ID        FPGA board ID
  -d DEVICE, --device DEVICE
                        device id (vendor:product); default is (1d50:6130)
  -a ADDR, --addr ADDR  force the address to write the bitstream to
  -m, --meta            dump out the metadata for all connected boards in JSON
  --update-bootloader   check for new bootloader and update eligible connected
                        boards
  --libusb              try using libusb to connect to boards without a serial
                        driver attached
  --pyserial            use pyserial to connect to boards

So in theory, this should have forced the issue in WSL and used the serial port, but no luck:

tinyprog --pyserial --list

    TinyProg CLI
    ------------
    Using device id 1d50:6130
    No port was specified and no active bootloaders found.
    Activate bootloader by pressing the reset button.

I also tried setting permissions, just in case:

sudo usermod -a -G dialout $USER
sudo usermod -a -G tty $USER

Microsoft claims that Serial COM ports have been supported on WSL since Windows Insider Build 16176. There's also this WSL issue #1929 that indicates serial port issues have been resolved.

Annoyingly, although Linux starts counting at zero, Microsoft instead apparently decided to instead start at 1 for serial ports in WSL.  Thus /dev/ttyS0 for Linux is COM1: on the PC, however COM1: will be /dev/ttyS1 on WSL.

Google Search Result for "linux list serial ports"


I also opened a new Recognizing TinyFPGA BX in WSL topic on the tinyFPGA discourse site.

UPDATE: many thanks to lawrie.griffiths for his help on the tinyFPGA discourse thread for determining that although the --list and --meta parameters do not currently work in WSL, forcing a reboot with -b and most importantly, programming with -p while explicitly naming the com port with the -c option does work! Woohoo :)

Here are the commands in WSL of interest:


# force tinyFPGA to exit bootloader (reset or unplug board afterwards as needed)
tinyprog -b -c /dev/ttyS12

# program the tinyFPGA, while explicitly naming the port
tinyprog  --com /dev/ttyS12 -p hello_word.bin

As a reminder, do not modify WSL filesystem file from Windows! Yes, I've seen some pretty weird things happen when I tested that. But feel free to edit any other files. For instance, the entire C:\ directory is available in WSL as /mnt/c/.


Check out my next blog on setting up a soft RISC-V CPU on the tinyFPGA.

Resources, Inspiration, Credits, and Other Links:


Please leave comments, ideas, suggestions below (moderated, sometimes delayed) or send me a message at gmail, or find me on twitter.

Find gojimmypi at gojimmypi.github.io

I'm currently working on my new blog home at  gojimmypi.github.io After implementing a variety of features such as dark mode , syntax hi...